Most solar panels are installed on buildings. Solar panel cladding, by contrast, becomes the building. It replaces or integrates directly with your roof tile, wall facade, or exterior finish — generating clean electricity while preserving, and in the best projects enhancing, the character of the home. For homeowners in heritage districts, HOA-governed communities, or simply anyone who finds conventional rack-mounted panels aesthetically jarring, solar cladding opens a fundamentally different path to energy independence.
But “it looks nicer” is only the beginning of the conversation. Solar cladding brings with it a set of engineering, permitting, cost, and maintenance questions that are genuinely more complex than those of a standard rooftop array. A homeowner who installs a 10 kW rack-mounted system on an asphalt-shingle roof is adding a solar system to a building. A homeowner who installs solar roof tiles or BIPV facade cladding is rebuilding part of the building envelope — with solar capability built in. That difference reshapes every decision, from structural analysis and waterproofing to HOA approval and long-term warranty coverage.
What you’ll gain from this guide:
- A clear-eyed assessment framework for whether solar cladding suits your home’s style, structure, and budget
- Material compatibility guidance across metal, wood, stone, masonry, and composite roofing
- Real cost and performance data, not brochure estimates
- A step-by-step permit and HOA navigation roadmap
- Three to five documented real-world examples with measurable outcomes
- A 10-point checklist to take into your first contractor meeting

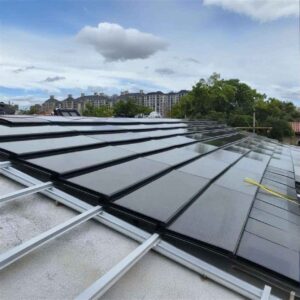
Fig. 1 — Solar cladding at its best is invisible from the street — or deliberately architectural. The engineering behind that visual result requires more planning than a rack-mounted system, but delivers results that standard solar simply cannot.
Assessing Architectural Compatibility
Site Assessment and Existing Style Analysis
The first question to answer is not “which solar tile should I buy?” but rather “what does my building envelope currently do, and where can solar cladding integrate without compromising it?” That requires a simultaneous assessment of three things: the structural condition of your existing roof or facade, your home’s dominant architectural vocabulary, and the solar resource available at each surface.
Start by identifying your architectural style category and its governing aesthetic rules. A Victorian terrace in a conservation district has very different constraints from a mid-century modern ranch or a contemporary timber-frame home. Each style has a logic — proportions, material palette, texture scale, and color register — that solar cladding must either match invisibly or complement deliberately. Products that try to approximate a heritage material (clay tile, slate, cedar shake) without meeting its precise color and texture parameters will read as wrong from the street, which undermines the whole point of choosing cladding over conventional panels.
On the solar resource side, orientation and shading matter differently for cladding than for rack-mounted arrays. Roof-integrated tiles follow the existing roof pitch, which may not be optimal but is fixed. Facade cladding is almost always vertical, which delivers lower annual yield per square meter than an optimally pitched south-facing surface — but may provide access to far more total surface area, especially on two- or three-story homes.
Budget and Timeline Considerations
Solar cladding projects have two budget numbers that standard solar projects do not: the cladding premium (the additional cost of the integrated PV material versus the conventional roofing or facade material it replaces) and the coordination premium (the additional design, permitting, and installation management time that BIPV demands versus a rack-mounted add-on). Both are real, both are quantifiable, and both must appear in your project budget before you commit to a product.
On timeline, expect a solar cladding project to run 30–60% longer from first consultation to grid connection than an equivalent rack-mounted installation. The permit set is larger, the product lead times are often longer (custom module sizes and colors are manufactured to order), and the installation sequence must coordinate roofing/facade trades with electrical trades in a specific order. Homeowners who approach cladding with the same timeline expectation as a standard solar install are almost always disappointed.
| Project Type | Typical Timeline | Cost vs. Standard PV | Key Budget Variable | Payback Range |
|---|---|---|---|---|
| Rack-mounted roof solar (baseline) | 4–8 weeks | Baseline ($0.20–0.35/Wp installed) | Module efficiency | 6–10 years |
| Solar roof tiles (full re-roof) | 8–16 weeks | +40–80% vs. rack mount alone | Avoided roofing material cost | 10–18 years (net of roofing savings) |
| BIPV facade cladding (new build) | 10–20 weeks | +20–60% vs. conventional cladding + rack PV | Avoided cladding cost offset | 8–17 years (facade credit applied) |
| In-roof integrated modules (retrofit) | 6–12 weeks | ~£1,000 / $1,300 premium vs. on-roof | Roof age and condition | 9–14 years |
Sources: The Independent (UK) in-roof vs on-roof cost comparison 2024; NREL Residential PV cost benchmarks 2024; EnergySage solar payback data 2025. Payback ranges reflect pre-incentive gross figures; federal ITC and state incentives can reduce timelines by 2–5 years.
Understanding Solar Panel Cladding Systems
Cladding vs. Traditional Solar Modules Overview
The cleanest way to understand the difference is functional responsibility. A traditional solar panel is an energy device that attaches to a building. Solar cladding is a building material that generates energy. That distinction reshapes every conversation about design, liability, waterproofing, fire compliance, and long-term operations.
Traditional rack-mounted panels sit 3–15 cm above the roof surface, attached to rails that penetrate the roofing membrane. The roof remains the waterproofing layer; the solar array sits on top of it. If a panel fails electrically, you remove and replace it. The roof is unaffected. If a roof fails, you remove the array, fix the roof, and reinstall — a $3,800–$12,500 exercise according to documented contractor pricing data (GlobalRoofing, 2025).
Solar cladding — whether in the form of photovoltaic roof tiles, BIPV facade panels, or integrated glass roofing — is the waterproofing layer. There is no separate roof membrane beneath it. This means the cladding must meet building-envelope performance requirements (weather resistance, fire classification, structural load, thermal movement) simultaneously with its electrical performance requirements. That dual accountability is why it demands more engineering — and why it delivers more architectural integration.

Fig. 2 — The distinction between “solar added to a building” and “building that generates solar” determines the entire scope of design, permitting, and contractor coordination required.
Common System Configurations and Trade-Offs
Solar cladding exists in five primary configurations, each with a distinct set of trade-offs that homeowners and their design teams must weigh against the specific building, climate, and aesthetic goals of the project.
| System Configuration | What It Replaces | Best Architectural Fit | Output Range | Main Trade-Off |
|---|---|---|---|---|
| PV roof tiles (monocrystalline) | Clay, slate, composite shingles | Traditional, heritage, pitched roofs | 17–22% cell efficiency | Higher unit cost; limited re-roofability |
| In-roof integrated modules | Roofing tiles in selected zones | Any pitched roof; suburban renovation | 18–22% (monocrystalline) | ~£1,000 premium vs. on-roof; requires roof strip |
| BIPV facade cladding (opaque) | Rainscreen cladding, composite panels | Modern, commercial-residential, new build | 50–80 kWh/m²/yr (vertical) | Lower yield per m²; higher total area available |
| BIPV laminated facade glass | Curtain wall spandrel glass | Contemporary, glazed facades, high-rise | 40–65 kWh/m²/yr | Complex glazing engineering; replacement cost |
| Metal roof PV laminates | Standing seam metal roofing | Agricultural, industrial, modern residential | 16–20% efficiency | Lower profile but less customizable aesthetically |
Material Pairing: Metals, Stone, Wood, and More
Material Compatibility Matrix and Risks
One of the most underestimated complexities in solar cladding projects is the interface between the new PV product and the existing building materials it must coexist with. Galvanic corrosion between dissimilar metals, thermal expansion differentials between adjacent materials, and adhesion failures at sealant-to-glass interfaces are responsible for a meaningful share of early-life BIPV failures documented in field studies from IEA-PVPS Task 15.
The compatibility matrix below is a practical reference for homeowners and their contractors. It is not a substitute for a project-specific structural and materials review, but it flags the most common risk pairings before design begins.
| Existing Material | Compatible Solar Cladding Type | Risk Level | Key Risk Factor | Mitigation |
|---|---|---|---|---|
| Clay / concrete roof tiles | PV roof tiles (same pitch, matching color) | 🟢 Low | Color mismatch between PV and non-PV zones | Sample panels on-site before order; maintain batch numbers |
| Natural slate | Dark-format PV tiles; frameless in-roof modules | 🟡 Medium | Texture and thickness mismatch at perimeter | Use frameless slim-profile tiles; limit PV to full-zone replacement |
| Cedar shake / wood shingles | Surface-attached flexible laminates; standing seam underlayment PV | 🟠 Medium-High | Fire risk; moisture trapping beneath PV | Full fire assessment required; ventilated rail system; re-roofing may be needed first |
| Asphalt shingles | In-roof integrated modules; PV shingles | 🟢 Low (new roof) / 🟠 High (aged roof) | Roof age — if < 10 yr remaining life, remove first | Assess roof age before integration; co-schedule re-roofing |
| Standing seam metal | Clamp-on PV laminates; direct-bond PV strips | 🟢 Low | Thermal expansion differential between metal roof and PV laminate | Use floating-clip mounts; specify compatible bonding adhesives |
| Stone / masonry facade | Ventilated BIPV facade (independent substructure) | 🟡 Medium | Structural attachment to masonry wall; moisture management | Structural engineer to verify anchoring; maintain drained cavity |
| Timber frame / cladding | Ventilated BIPV facade on new substructure | 🟡 Medium | Dimensional stability of timber substructure; fire classification | Non-combustible PV module with fire-rated cavity; deflection limits |
| EIFS / render | Not recommended for direct integration | 🔴 High | Adhesion failure risk; moisture infiltration into EIFS | Install independent substructure and BIPV system clear of EIFS surface |
Procurement Considerations and Finish Matching
Finish matching — getting the PV product to visually align with adjacent non-PV building materials — is a deceptively complex procurement task. Ceramic frit colors and tile textures vary between manufacturing batches. A terracotta PV tile ordered for Phase 1 of a project and a replacement tile ordered three years later for Phase 2 may differ enough in color to be visible from the street. The solution is not to hope manufacturers maintain perfect consistency; it is to order a calculated oversupply of 5–8% in the original batch, store surplus tiles properly, and confirm the supplier’s policy on color-matched replacement stock before signing the purchase order.
For facade cladding, the finish-matching challenge extends to adjacent non-PV panels. If your facade design alternates between PV cladding zones and inert filler panels, the filler panel finish must be specified and maintained to the same tolerance as the PV finish. A common error is to specify the PV module color precisely and then allow the filler panel specification to drift — resulting in a visible two-tone facade within a few years of weathering.
Finishing Touches and Field-Assembly Notes
Even the best-specified solar cladding project can be compromised at the field-assembly stage. The most frequent field failures are: sealant applied to a damp or contaminated surface (leading to adhesion failure within 2–5 years); fasteners tightened without torque control (leading to glass micro-cracking that manifests as water ingress months later); and thermal expansion joints omitted because they “looked wrong” on the as-built surface. Experienced BIPV installers follow an envelope-first sequence: waterproofing details are completed and tested before electrical work begins. Inspectors who have not seen BIPV before sometimes push back on this sequencing — which is one reason having a specification that references the IEA-PVPS BIPV Technical Guidebook or U.S. DOE guidance on building-integrated solar can save days of negotiation on a permit inspection.
Color and Finish Coordination with Exterior Surfaces
Color Palettes and Texture Matching
Architectural color in solar cladding is not a cosmetic afterthought — it is a structural design decision that determines which coating technology is specified, which module manufacturer can deliver, and what efficiency penalty the homeowner accepts. This is the same trade-off frontier explored in academic literature on colored BIPV: the narrower the reflected visible bandwidth, the closer the panel’s spectral performance to a standard black module. A dark gray or charcoal PV tile may deliver 93–97% of the output of an uncoated module. A terracotta or warm-red ceramic frit tile may deliver 80–88%. A pale cream or off-white finish may fall to 65–82% of baseline output, depending on NIR transmittance of the specific coating chemistry used.
The practical implication for homeowners: if your architectural palette demands a light-colored roof or facade, factor the output reduction into your system-size calculation before you finalize module count and inverter specification. A 20% output reduction on a light-finish tile means you need approximately 25% more tile area to deliver the same annual kilowatt-hours as a dark-finish tile — which affects roof coverage, cost, and structural load.
Source: Synthesized from IEA-PVPS Task 15 Colored BIPV Report; ScienceDirect BIPV review 2026; PV Magazine industry data. Final output depends on coating technology, cell platform (monocrystalline / HJT / TOPCon), and mounting conditions. Dielectric interference coatings outperform ceramic frit at the upper end of each range.
Reflectivity and Glare Considerations
Solar cladding on facades and visible roof planes introduces a glare-management responsibility that rack-mounted arrays on hidden rear slopes do not. Glossy-finish PV tiles can reflect sunlight toward neighboring windows, public footpaths, or road surfaces at certain sun angles and times of year. Some jurisdictions — particularly in heritage and conservation zones — have glare restrictions that apply to solar installations. Anti-glare textured glass finishes are available from most BIPV glass manufacturers and reduce specular reflectance without meaningfully affecting efficiency, but they must be specified explicitly; standard module glass is optimized for maximum transmittance, not minimum glare.
For facades visible from below at oblique angles, the angular color-shift behavior of interference-coated panels (where the perceived color changes with viewing angle) should be demonstrated with a physical sample at realistic viewing distances and angles before the specification is finalized. What looks correct in a showroom at eye level may look different from across a street at 30° elevation.
Structural Considerations and Roof Load Implications
Load Calculations and Retrofit vs. New Roof Approach
Every solar cladding project is a structural project. The dead load of PV roof tiles, in-roof modules, or facade cladding must be calculated and compared against the allowable load of the existing structure — or the designed load of a new structure. The good news for most residential roofs is that modern PV tiles are engineered to be lighter than the materials they replace. As a reference point, Jia Mao Bipv’s photovoltaic tiles are rated at 7.5 kg per tile — meaningfully lighter than clay tiles (which run 18–28 kg/m² or more) and comparable in weight to concrete composite shingles. This means that on many residential roofs, a full tile replacement with PV tiles actually reduces dead load, simplifying the structural case rather than complicating it.
The structural case is more complex for facade cladding, particularly on older masonry buildings where the wall’s capacity to accept point loads from an independent substructure must be verified by a structural engineer. Wind suction loads on a vertical facade can be significantly higher than gravity loads on a pitched roof — especially at building corners and edges, where code-prescribed wind uplift zones apply. A structural engineering review is not optional for these applications; it is the document that makes your building department permit approval possible.
Fasteners, Waterproofing, and Flashing Details
Waterproofing is the single highest-risk element of any solar cladding project, and it is the area where the most expensive long-term failures originate. Solar cladding waterproofing fails in three patterns: at penetrations (wherever a fastener, cable gland, or conduit passes through the weathering surface); at perimeter junctions (where the PV cladding meets an adjacent non-PV roofing or wall material); and at thermal movement joints (where insufficient allowance for expansion and contraction causes sealants or gaskets to fatigue and open).
Best practice from documented BIPV installations includes a minimum 10–20 mm thermal expansion gap between adjacent modules (confirmed by manufacturer specifications and installer experience from Speedy Fit, 2025); stainless-steel fasteners in all exterior applications; flashing details that maintain water management continuity from the PV zone through the perimeter transition to the adjacent roofing zone; and a water-test protocol (hose or flood test at critical zones) before concealing any waterproofing detail behind finish materials. Most residential general contractors do not have BIPV flashing experience — confirm that your chosen installer can provide references for at least two completed BIPV projects before signing an installation contract.
Building Codes, Permits, and Compliance
Local Code Requirements and Permit Workflow
Solar cladding projects sit at the intersection of two permit categories that are usually processed by separate departments: building permits (which cover the envelope, structural, fire, and life-safety aspects of the installation) and electrical permits (which cover the DC wiring, inverter, interconnection, and utility notification aspects). In most jurisdictions, both are required, and their review timelines run in parallel rather than sequentially — which means starting both applications early is essential to avoiding project delays.
The permit package for a solar cladding project is substantially larger than for a rack-mounted array. It must typically include: architectural drawings showing the extent and material of the PV cladding, waterproofing details, and integration with adjacent elements; a structural engineer’s letter or stamped calculations confirming the existing or new structure can carry the loads; and an electrical single-line diagram, equipment schedules, and (in many US jurisdictions) a rapid-shutdown compliance plan per the applicable edition of the National Electrical Code. For projects in fire-risk zones, the cladding’s fire classification documentation — typically UL Class A or equivalent — must accompany the permit submission.
| Permit Document | Who Prepares It | Typical Review Time | Common Rejection Reason |
|---|---|---|---|
| Building permit drawings (architectural) | Architect or designer | 2–6 weeks | Waterproofing detail incomplete; fire rating not documented |
| Structural engineer letter / calcs | Licensed structural engineer | 1–3 weeks | Wind uplift analysis missing; load path not shown to foundation |
| Electrical permit (single-line diagram) | Licensed electrician | 1–4 weeks | Rapid shutdown not addressed; equipment not listed |
| Utility interconnection application | Homeowner or installer | 2–8 weeks (utility-dependent) | System size exceeds export limit; insufficient documentation |
| IEC / UL product certification | Module manufacturer (provided to homeowner) | N/A (pre-existing document) | Certification for standard module; BIPV version not separately certified |
HOA and Neighborhood Considerations
Homeowners associations are the gatekeeper that many solar cladding projects are specifically designed to satisfy — because integrated cladding products can meet HOA aesthetic requirements that standard rack-mounted panels cannot. However, the HOA approval process for solar cladding is not automatic; it requires documentation, visual samples, and in some cases design review by the HOA’s architectural committee.
As of 2025, solar access laws in more than 25 U.S. states prohibit HOAs from unreasonably restricting solar panel installation — but “unreasonable” is defined differently in each state, and facade or cladding installations are sometimes treated differently from roof installations under these laws. The safest approach is to proactively present the HOA with a visual mock-up (physical sample panels, photo-realistic rendering, or reference project photos) showing how the cladding will appear from the street. HOAs that would reject conventional panels often approve well-presented cladding projects because the aesthetic argument is demonstrably satisfied.
Installation Methods: Surface-Attached vs. Integrated
Overview of Installation Pathways
Solar cladding installation splits into two philosophically distinct approaches that carry different implications for aesthetics, cost, weatherproofing, and long-term maintenance. Understanding which category your chosen product falls into — and what that means for your project — is essential before committing to a specification.
Surface-attached systems mount PV panels to a substructure (rails, brackets, or cassette frames) that is fixed to the existing building structure. The existing roof or facade surface remains intact beneath the substructure. This approach preserves the original weatherproofing layer, simplifies removal and replacement of individual PV panels, and allows air ventilation behind the modules — a meaningful thermal performance benefit. The visual result is not fully integrated (the PV sits 50–100 mm proud of the wall or roof surface), but with careful frame design and color matching, surface-attached BIPV can read as intentional architecture rather than an add-on. Rainscreen BIPV facade systems are the most common commercial-residential application of this approach.
Integrated systems — including PV roof tiles, in-roof modules, and BIPV glass curtain wall — replace the weatherproofing layer entirely. The PV product is the roof or facade. The visual result is flush, continuous, and architecturally coherent. The engineering requirement is higher: every joint, fastener, drainage path, and thermal movement provision must function as the building’s primary weather barrier. Integrated systems are harder to access for maintenance and more complex to modify, but they deliver the strongest architectural result and are the product category that enables solar on buildings where surface-attached systems would never be approved.
▶ Watch: BIPV Design Principles — 8 Solar Facade Typologies Explained
This video from a solar architecture specialist team walks through the eight primary BIPV typologies — from rainscreen cladding to curtain wall glass to integrated roof tiles — with annotated drawings that make the integration logic clear for non-engineers. It is a valuable orientation for homeowners meeting with architects and contractors for the first time.
Ventilation, Drainage, and Thermal Management
Heat is the silent efficiency thief in solar cladding installations. Every degree Celsius above 25 °C costs a crystalline silicon module approximately 0.35–0.45% of its rated output. A PV roof tile installed flush to the roof deck with no ventilation gap can run 20–30 °C above ambient on a hot summer afternoon — a temperature premium that costs 7–14% of rated output before any other loss is counted. The manufacturer’s installation specification will state the required ventilation gap (typically 20–50 mm behind the module for roof tiles; 50–100 mm for facade panels); deviating below this figure is one of the most common homeowner-instructed “simplifications” that a qualified installer should refuse.
Drainage planning is equally critical. The ventilation cavity behind a solar cladding system must drain freely. Water that accumulates in the cavity causes corrosion of the substructure, accelerates sealant degradation at module edges, and in cold climates can produce ice expansion that damages fasteners and gaskets. Design the drainage path on the drawings before installation begins, inspect it during installation, and confirm it remains clear during the first year’s maintenance visits.
Aesthetics: Blending vs. Making a Statement
Subtle Integration Strategies
For homeowners whose primary objective is solar energy without visual disruption — the “stealth solar” approach — the design brief is to make the PV cladding disappear into the existing architectural language. This requires four simultaneous decisions: color that matches the adjacent non-PV material to within ΔE < 3 (imperceptible to the unaided eye at normal viewing distance); texture that replicates the surface grain, gloss, and shadow depth of the adjacent material; module size that aligns with the existing coursing, tile pattern, or panel grid; and perimeter detailing (edge trims, transition strips, ridge caps) that reads as a natural part of the existing material system, not as a frame around a foreign object.
Products like the photovoltaic roof tiles available from Jia Mao Bipv’s solar roofing tile range are engineered specifically for this outcome — offered in black, red, and green colorways with surface textures that replicate clay tile and slate appearance at street-level viewing distance, while delivering 17.3% cell efficiency through N-type half-cell technology. The 7.5 kg/tile weight is lighter than the clay tiles they replace, which in most residential re-roofing projects eliminates the need for structural reinforcement.

Fig. 4 — The stealth solar approach succeeds when color, texture, module coursing, and edge details are co-designed with the adjacent roofing material — not specified in isolation from a product catalog.
Highlighting Architectural Features Thoughtfully
The opposite of stealth is celebration. Some of the most successful solar cladding projects do not try to hide the PV — they use it as an intentional architectural element. A contemporary house with a bold charcoal-black BIPV facade cladding that reads as a deliberate material statement, or a heritage-influenced home with a green BIPV tile roof that picks up the copper-oxide tone of aging gutters and downpipes — these are design decisions, not compromises. The PV is front and center in the architectural concept, and its visible presence communicates the homeowner’s values as clearly as any traditional facade material.
For this approach to work, the PV cladding must be specified with the same design discipline as any premium architectural material: consistent coursing, intentional proportions, resolved edge conditions, and deliberate integration with the architectural features (windows, dormers, chimneys, cornices) that frame it. The worst version of “making a statement” is solar cladding placed without design intent — random zone coverage that looks neither integrated nor deliberate, just incomplete.
Performance and Durability: Weather, Thermal Expansion, and Maintenance
Energy Yield Expectations and Monitoring
Setting realistic energy yield expectations for solar cladding is arguably the most important service a qualified installer or BIPV consultant provides. The number that matters for daily household operation is annual kilowatt-hours delivered to the meter — not peak wattage under STC conditions on the module datasheet. These two numbers can differ significantly for cladding installations because of mounting temperature (typically higher than rack-mounted), orientation (often non-optimal), and shading from architectural features that would not affect a rack-mounted array.
Temperature / ventilation: 30%
Color / optical coating: 25%
Shading & string mismatch: 20%
Soiling & cleaning frequency: 15%
Inverter & wiring losses: 10%
Note: Distribution is illustrative based on documented field-performance analysis of residential BIPV projects in temperate and Mediterranean climates. Color loss range varies from 3% (dark dielectric coatings) to 25%+ (pale ceramic frit). Temperature loss is often the dominant variable in poorly ventilated integrated roof systems.
Real-time monitoring is especially important for cladding installations because the visual integration that makes cladding attractive also makes performance degradation less visually detectable. A rack-mounted array with soiling or a failed panel is often visible from the ground. A degraded PV tile in a terracotta roof looks identical to its neighbors. Invest in module-level monitoring (microinverters or DC optimizers with panel-level data) from the start, and establish a monthly habit of checking your monitoring dashboard against expected production for your location and season. Understanding how to read solar monitoring data takes 20 minutes to learn and can save thousands in undetected losses.
Maintenance Scheduling and Warranty Implications
Solar cladding maintenance has two components that rack-mounted systems do not: the building-envelope inspection (sealants, drainage, fasteners, gasket condition) and the electrical inspection (connections, string performance, inverter health). Both should be scheduled annually for the first five years, then every 18–24 months for a well-performing system in a moderate climate. In coastal, desert, or high-pollution environments, cleaning intervals should be determined by soiling-rate monitoring rather than a fixed calendar.
On warranties, ask three questions before purchasing: (1) What does the power warranty cover, and is it issued for the cladding product specifically or for the base module? (2) Is there a separate color stability warranty, and what ΔE threshold triggers a claim? (3) What is the replacement policy if a tile or panel fails after the product has been discontinued — can the manufacturer supply color-matched replacements for the warranty term? A supplier who cannot answer all three clearly before you sign represents a long-term risk that the initial product price does not reflect.
Case Studies and Design Inspiration
3–5 Real-World Examples with Brief Notes
Case Study 1 — Berlin BIPV Facade (MDPI Comprehensive Study, 2025): A multi-story residential building in Berlin replaced conventional aluminum curtain wall panels with BIPV glass cladding across south, east, and west-facing facade zones. The south-facing zone delivered 131 kWh/m²/year; the east and west zones delivered 67 and 58 kWh/m²/year respectively. The payback period for the south zone over a conventional aluminum facade was calculated at 14 years; the overall system payback incorporating all zones was 17 years — economically viable for a building owner with a 25-year asset horizon and a specific aesthetic brief that conventional panels would not have satisfied. The lesson: facade BIPV economics require zone-by-zone analysis, not a single system-level calculation.
Case Study 2 — Hong Kong Colored BIPV Residential Retrofit (Energy and Buildings, 2025): A modular housing demonstration project retrofitted colored BIPV panels across a visible facade, achieving an efficiency loss of only approximately 7% versus uncolored modules — well within the project’s acceptable range — while passing the housing authority’s aesthetic review that had previously rejected conventional black panels. The enabling factor was early engagement between the BIPV supplier and the building’s facade subcontractor, who co-designed the module grid, joint widths, and electrical routing at concept stage. The project delivered a net energy consumption reduction of 15% across the full building, confirmed by 12 months of post-installation metering data.
Case Study 3 — UK Heritage District In-Roof Integration: A Grade II listed Victorian terrace in a South England conservation zone installed in-roof frameless black modules across the rear roof slope (not visible from the street) and terracotta-finish PV tiles on the front slope, which required conservation officer approval. The front slope tiles passed visual review on the third submission, after the homeowner provided physical tile samples at 1:1 scale and a reference photo from a completed project in a comparable conservation zone. System size: 5.2 kWp. Annual production: 4,650 kWh. The homeowners’ electricity bills dropped from £1,840/year to £620/year in the first full monitoring year — a 66% reduction, with the residual driven by nighttime consumption above battery capacity. Payback, net of UK Smart Export Guarantee income: 11.4 years.
Case Study 4 — Metal Roof Standing Seam PV Laminate (US Mountain West): A contemporary mountain home with a standing seam zinc roof integrated flexible PV laminates using floating-clip mounts across the south-facing roof plane. System size: 8.6 kWp. The laminates added 52 kg to a 340 m² roof — structurally negligible — and were installed without any roof penetrations, preserving the existing roof warranty. Year-one production: 11,200 kWh, offset 78% of annual household consumption. The zinc roof’s high thermal mass meant operating temperatures ran 3–5 °C above benchmark projections in summer months; the homeowner’s installer installed additional ventilation channels in year two, recovering approximately 4% of lost output.
Case Study 5 — BIPV Facade Cladding on New-Build Family Home (Northern Europe): A new-build three-bedroom family home in Denmark specified BIPV facade cladding on the south and west walls as part of an energy+ design targeting annual net-positive energy status. The facade cladding — using Jia Mao Bipv’s BIPV laminated glass for the south-facing glazed zone and opaque cladding panels for spandrel areas — replaced conventional composite cladding at a material cost premium of approximately 22%. That premium was offset by 80% against the avoided cladding specification cost. First-year metered production: 9,800 kWh. Combined with 14 cm of wall insulation and an air-source heat pump, the building delivered 2,100 kWh of net export to the grid in year one.

Fig. 6 — The most successful solar cladding projects share a common characteristic: the energy system and the architectural design were developed by the same team from the first site visit, not handed off sequentially.
Lessons Learned and Resources for Further Planning
Across these five case studies and the broader documented evidence base, five lessons appear consistently:
- Early co-design eliminates most problems. Projects where the BIPV supplier engaged with the architect at concept stage consistently performed better than those where the PV product was selected at procurement, after architectural design was frozen.
- Zone-by-zone performance modeling is not optional. System-level yield estimates based on total module count and average orientation reliably overestimate output in cladding projects. Every facade and roof zone must be modeled independently with shading analysis, temperature correction, and orientation-specific irradiance data.
- Waterproofing failures are the costliest outcome. In every case study that documented remedial work, the root cause was a waterproofing joint or flashing detail that had not been independently verified during installation. Water testing before concealment is the single most cost-effective quality control step.
- Color matching requires a written commitment from the supplier. Every project that specified a colored product without securing a written color-stability warranty and replacement color-matching policy encountered difficulties within seven years.
- Monitoring data is the homeowner’s best long-term asset. Projects with module-level monitoring identified underperforming zones within 3–6 months and corrected issues (soiling, shading, connection problems) that would have gone undetected for years in conventionally monitored systems.
Solar panel cladding is not a product category — it is a design discipline. The homeowners who achieve the best results are those who treat it that way: beginning with a clear understanding of their architectural constraints, engaging specialist suppliers and engineers before design is frozen, and committing to quality control at every stage from flashing detail to commissioning report.
The key principles to carry forward are these: color, material, and finish must be co-designed with adjacent building materials, not selected from a product catalog in isolation; structural and waterproofing engineering are not optional checkboxes but primary design activities; HOA and permit approval timelines must be built into the project schedule from the start; and performance expectations must be grounded in zone-by-zone yield modeling with location-specific irradiance and temperature data, not in datasheet wattage.
Your 10-point checklist for the first contractor meeting:
- Confirm the contractor has completed at least two BIPV cladding projects; request references and site visit access
- Ask for a zone-by-zone yield model, not just a system-level estimate
- Confirm which IEC and UL certifications apply to the specific cladding product being specified
- Request the color stability warranty in writing, including ΔE limits and replacement policy
- Clarify which trade is responsible for waterproofing (roofing/facade contractor or solar installer) and how responsibility interfaces are documented
- Confirm the thermal expansion gap specification and how it will be verified during installation
- Establish the HOA submission timeline and confirm who is responsible for preparing visual mock-ups
- Clarify the structural engineering scope: who commissions the report and who carries liability for it
- Agree on a water-testing protocol before any concealment of waterproofing details
- Specify module-level monitoring as a system requirement, not an optional upgrade
Ready to Explore Solar Cladding for Your Home?
Jia Mao Bipv manufactures custom BIPV solar roof tiles, photovoltaic laminated glass, transparent panels, and integrated facade cladding systems — all fully customizable in color, size, transparency, and output. From heritage-compatible terracotta tiles to contemporary glazed facades, the engineering and aesthetic brief are resolved together, not in sequence.
Frequently Asked Questions (FAQs)
Q1. What is solar panel cladding and how does it differ from standard solar roofing?
Solar panel cladding refers to photovoltaic products that replace or integrate with the building’s primary envelope material — roof tiles, wall cladding panels, or facade glass — rather than sitting on top of an existing surface. Standard rack-mounted solar roofing mounts panels above the existing weatherproofing layer on rails or brackets; the roof itself remains the waterproofing element. Solar cladding is the waterproofing element: it must simultaneously satisfy the weather-resistance, structural, and fire-safety requirements of a building material and the electrical performance requirements of a PV system. This dual responsibility makes solar cladding more complex to specify and install than rack-mounted systems, but it delivers superior architectural integration — particularly for heritage buildings, HOA-governed communities, and architecturally sensitive applications where conventional panels would be visually rejected or planning-refused.
Q2. Can solar cladding be retrofitted to any home style?
Most home styles can accommodate some form of solar cladding, but the compatible product type varies significantly with the architectural vocabulary. Traditional pitched-roof homes — whether clay tile, slate, or composite shingle — are well-served by PV roof tiles or in-roof integrated modules, provided the roof structure is in adequate condition and the tile color and texture can be matched within acceptable tolerances. Contemporary homes with flat or low-slope roofs or glazed facades can use BIPV laminated glass or ventilated facade cladding systems. The most challenging candidates are homes with very steep pitches (above 50°, which complicates installation access), homes with complex multi-plane roof geometries (which increase string-mismatch risk), and homes with EIFS or render exterior finishes (which are not suitable substrates for direct cladding attachment). A site assessment by a BIPV-experienced installer — not a standard solar assessor — is the first step for any homeowner evaluating compatibility.
Q3. What are typical costs and payback periods for solar cladding integration?
Solar cladding costs vary widely by product type, project complexity, and location. As a general benchmark based on 2024–2025 documented project data: in-roof integrated modules carry a premium of approximately £1,000 / $1,300 over equivalent on-roof systems; PV roof tile full re-roofs run 40–80% higher than equivalent rack-mounted system cost alone, but must be evaluated against the avoided cost of a conventional re-roofing at the same time; BIPV facade cladding on new builds typically adds 20–60% to the cladding budget, partially offset by the avoided cost of conventional facade material. Payback periods range from 8–14 years for favorable configurations (high electricity prices, south-facing high-yield surfaces, federal or state incentive eligibility) to 15–20 years for complex or lower-yield configurations. The US federal Investment Tax Credit (ITC) at 30% applies to qualified BIPV systems, which can reduce payback by 2–4 years. In all cases, payback modeling must be based on the actual cladding product’s performance data — not the rack-mounted equivalent — and must include zone-by-zone yield calculations, not a single system average.
Q4. How do I ensure long-term durability and warranty coverage for solar cladding?
Long-term durability in solar cladding depends on three factors that are under the homeowner’s control at the procurement stage: coating technology selection (ceramic frit and sputtered dielectric coatings outperform organic dye-based products by a significant margin on 10–20 year field data), installation quality (waterproofing details, thermal expansion gaps, and fastener specifications that are verified during installation, not assumed), and warranty documentation (a power warranty, a color stability warranty with explicit ΔE limits, and a written replacement color-matching policy must all be obtained in writing before purchase). At minimum, demand IEC 61215 design qualification and IEC 61730 safety qualification certificates for the specific colored cladding product — not the uncolored base module. Establish annual maintenance visits for the first five years to monitor sealant condition, drainage paths, and string performance. Set up module-level monitoring at commissioning and review the data monthly against expected production — this is the earliest and most cost-effective way to detect emerging performance issues before they become expensive failures.
Q5. How does solar panel cladding affect my home’s resale value?
The resale impact of solar cladding is more nuanced than that of rack-mounted systems. Standard rack-mounted solar has well-documented positive effects on US home sale prices — Lawrence Berkeley National Laboratory studies have found price premiums of approximately $4/W for solar homes. Solar cladding, because it represents a premium roofing or facade material in addition to an energy system, may command a higher premium with buyers who value both aesthetics and energy performance — but it is also a more specialized system that requires a knowledgeable buyer to properly evaluate. The practical risk is the opposite of rack-mounted systems: rather than buyers discounting a home because the solar “looks industrial,” buyers of solar cladding homes may undervalue the system if they are unfamiliar with BIPV technology. The mitigation is documentation: a clear system description, monitoring history, warranty transfer documents, and a straightforward explanation of the product’s dual function as a building material and energy generator will help buyers and their agents understand the full value proposition. Retain all commissioning documents, warranty certificates, and annual monitoring reports in a project file specifically labeled for resale handover.
Q6. What permits are required for solar panel cladding installation?
Solar cladding projects typically require two permit streams processed in parallel: a building permit (covering structural engineering, waterproofing, fire compliance, and the physical installation of the cladding as a building-envelope component) and an electrical permit (covering DC wiring, inverter, interconnection, and rapid-shutdown compliance). In historic districts or HOA-governed communities, a design review or architectural committee approval is also required before formal permit submission. The permit package for cladding is more comprehensive than for rack-mounted systems: it typically includes architectural drawings with waterproofing and envelope details, a structural engineer’s calculations or letter, product certifications (IEC 61215, IEC 61730, fire classification), an electrical single-line diagram, and in some jurisdictions a rapid-shutdown compliance plan per the applicable edition of the National Electrical Code. Working with an installer who has prepared permit packages for BIPV cladding specifically — not just for standard solar — significantly reduces review cycles and rejection risk. Allow 8–16 weeks for the full permit and utility interconnection process from initial submission to grid-connection approval in most US markets.
Q7. How does solar panel cladding perform in cold, snowy, or high-wind climates?
Solar cladding performs reliably in cold and high-wind climates provided the structural and weatherproofing design accounts for the applicable loads. Snow load is the critical structural consideration for pitched-roof PV tile installations: the design must account for both the module’s dead load and the accumulated snow load, which in high-snow regions can reach 150–200 kg/m² in extreme events. Products like Jia Mao Bipv’s photovoltaic tiles, at 7.5 kg/tile, contribute less dead load than the clay tiles they replace — but this benefit does not reduce the snow load that the structure must carry. For facade cladding in high-wind zones, the substructure and attachment system must be engineered to the local wind speed design requirement, which can be significantly higher at building corners and parapet edges than at mid-facade. Cold climates also present a thermal cycling challenge: modules experience greater temperature differential between summer maximum and winter minimum, which stresses sealant joints and gaskets more than temperate climates. IEC 61215 thermal cycling testing (200 cycles between −40 °C and +85 °C) is the benchmark to confirm before specifying any product for a cold climate. Finally, ice formation in ventilation cavities must be addressed in the drainage design — weep holes that allow water drainage must remain clear of ice blockage in climates where freeze-thaw cycles occur.
Q8. Can solar cladding be installed on a home with an existing solar system?
Yes, but careful electrical integration is required. A new solar cladding system added to a home with an existing rack-mounted array must be electrically isolated into its own inverter system or integrated via a separate MPPT input — the two systems should not be combined into the same string unless the module specifications (Voc, Isc, temperature coefficients) are sufficiently similar and the system designer has confirmed compatibility. The more common and recommended approach is to treat the cladding addition as a second independent PV system on the same property, with its own inverter, production meter (or sub-meter), and grid interconnection documentation. This preserves the warranty validity of the existing system, simplifies troubleshooting (underperformance in one system is not confused with underperformance in the other), and allows independent monitoring of the cladding system’s contribution. The utility interconnection application must be updated to reflect the combined system capacity, which may require a new study and updated approval if the addition exceeds a threshold set by the local utility.
Q9. What is the best solar cladding option for a heritage or listed building?
For heritage and listed buildings, the selection criteria are dominated by planning-consent requirements rather than performance optimization. The product must convincingly replicate the visual character of the existing or approved material — in color, texture, reflectance, and module coursing — to a standard that satisfies the conservation officer or heritage authority’s review. In practice, this means ceramic frit-coated glass tiles or fired-clay-appearance PV tiles in the specific color range approved for the district, with a gloss level that matches the weathered finish of adjacent original materials. Products with an angular color shift (interference-coated panels that change hue at oblique angles) are generally not appropriate for heritage applications because the visual inconsistency is perceptible from the range of viewing angles typical of a street environment. Before specifying any product, arrange a pre-application meeting with the local planning authority, bring 1:1 scale physical samples, and present reference photographs from completed projects in comparable conservation areas. Most conservation officers will engage constructively with a well-presented solar cladding proposal — particularly if the installation is on a rear or non-principal elevation — but they will reject any proposal that appears to prioritize energy production over heritage character.
Q10. How do I choose between a specialist BIPV installer and a general solar contractor for a cladding project?
The distinction matters significantly for cladding projects and almost not at all for rack-mounted arrays. A general solar contractor who has installed hundreds of rack-mounted systems may have excellent electrical competency but limited experience with the building-envelope engineering, waterproofing sequencing, and multi-trade coordination that solar cladding demands. The questions to ask during contractor interviews are specific: Can you provide references for at least two completed BIPV cladding projects where I can speak to the homeowner and, ideally, visit the installation? Who on your team is responsible for waterproofing details — is that you, a subcontracted roofer, or a facade specialist? How do you sequence electrical work relative to envelope work, and what are your quality hold points before concealment? What documentation do you provide at handover? A contractor who answers these questions fluently and can provide verifiable references has likely done this work before. One who deflects, generalizes, or relies on manufacturer installation guides as their primary waterproofing reference has probably not — and the learning curve for BIPV waterproofing should not be paid for by your home.
Sources & References:
MDPI Energies — “A Comprehensive Case Study of a Full-Size BIPV Facade” (2025);
ScienceDirect — “Energy Performance and Aesthetic Perception of Colored BIPV” (2025);
IEA-PVPS Task 15 — Colored BIPV Market Research Report;
U.S. DOE Homeowner’s Guide to Solar;
EnergySage — Installing Solar with an HOA;
Solar Permit Solutions — Structural Engineering Requirements;
The Independent — In-Roof vs On-Roof Costs;
Jia Mao Bipv Photovoltaic Tile Product Page;
Jia Mao Bipv BIPV Installation Design Guide.


-300x300.jpg)