Transform Dark Rooms in 48 Hours:
A Complete Solar Skylight Installation Guide
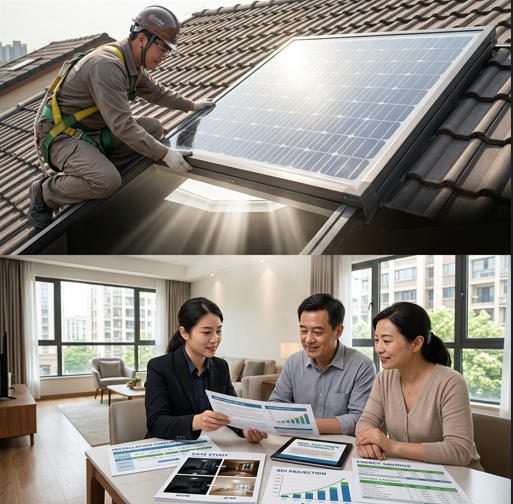
Master the entire solar skylight installation workflow and help your customers achieve stunning natural-light transformations in just two days — with real case studies, ROI analysis, and proven distributor sales strategies.

Walk into any dark hallway, basement office, or windowless kitchen and you immediately understand the problem your customers are trying to solve. Artificial lighting accounts for up to 15% of an average household’s electricity bill, and more than 60% of homeowners report dissatisfaction with the natural light levels in at least one room of their house. Solar skylights directly answer both complaints — slashing lighting costs while delivering the biological and psychological benefits of real daylight.
For solar and building products distributors, agents, and contractors, solar skylights represent a differentiated, high-margin product line with installations that take just 48 hours under standard residential conditions. Unlike a photovoltaic rooftop array that demands significant structural analysis and grid-tie permitting, a single solar skylight unit can go from site assessment to finished trim in two days, generating $800 to $1,500 in distributor net margin per project — with zero ongoing inventory carrying costs if you operate a supply-on-demand model.
This guide is built for professionals — not end consumers. It walks through every stage: site evaluation, tools, day-by-day installation steps, documented before-and-after case studies, maintenance protocols, and a structured sales and ROI framework to help you scale. Whether you are onboarding a new installation crew, building a distributor pitch deck, or evaluating whether solar skylights belong in your product catalogue, the data and operational playbook you need are on this page.
(CAGR 8.8%)
Section 1: Why Solar Skylights Belong in Your Sales Portfolio
The Market Demand for Natural Lighting Solutions
The global skylights market was valued at approximately $3.21 billion in 2026 and is projected to expand to $6.86 billion by 2035 at a compound annual growth rate of 8.8% (Business Research Insights, 2025). Within that market, solar-powered and BIPVBIPV — Building-Integrated Photovoltaics: Solar technology embedded directly into building materials (glass, roofing, facades) that generate electricity while serving a structural or aesthetic function — as opposed to add-on solar panels mounted on top of existing surfaces. skylight units are the fastest-growing sub-segment, propelled by three converging forces: rising residential electricity tariffs, evolving building energy codes mandating daylighting compliance, and the post-pandemic appetite for healthier home environments.
For context on the broader opportunity: solar rooftop capacity in the EU alone is forecast to grow from 247 GW in 2025 to 397 GW by 2030 (SolarPower Europe). Homeowners already receptive to solar panels are prime candidates for solar skylight upgrades — the trust is pre-built. Distributors who already serve this customer base can add solar skylights as a complementary, low-friction upsell with no new customer acquisition spend.
Key Benefits to Highlight to Your Customers
When presenting solar skylights to homeowners and property developers, the most effective approach anchors each benefit to a measurable outcome rather than a vague claim. Here is how to frame the core value proposition:
⚡ Energy Savings
A single venting skylight in a 150 sq ft room eliminates the need for artificial lighting during daylight hours, saving a homeowner $200+ per year on electricity bills according to VELUX data. In a kitchen or home office used 10+ hours daily, that figure approaches $350–$520 annually in high-rate states like California and Hawaii.
🧠 Health & Productivity
Cornell University Professor Alan Hedge’s landmark study found that workers in optimised natural-light environments reported an 84% drop in eyestrain, headaches, and blurred vision. The World Green Building Council puts the productivity uplift from better lighting at up to 23% — a powerful figure for home-office buyers.
🏡 Property Value
Florida housing data suggests skylights can add 5–10% to resale value, particularly when paired with energy efficiency upgrades. Zillow analysis shows energy-efficient homes sell roughly 1.4% higher and one week faster than comparable properties.
🌱 Sustainability
Every 1 m² of BIPV skylight glass generates approximately 140–200 kWh per year (climate-dependent), displacing carbon-intensive grid electricity. For architects and developers pursuing LEED credits or local green building certification, documented solar skylight installations contribute directly to USGBC LEED daylighting and energy categories.
Solar Skylight Technology Explained
A solar-powered skylightA skylight unit that uses an integrated small photovoltaic panel — typically 10–20 W — mounted on the exterior frame to charge an onboard rechargeable battery (NiMH or Li-ion). This battery powers an electric motor to open, close, and control blinds without any external wiring. combines three subsystems in one unit: a glazed light aperture (typically double or triple-pane Low-E glass), an integrated solar panel (10–20 W) that charges an onboard battery, and an electric actuator motor that opens the vent flap without any connection to the home’s mains wiring. This “no-wire” design is what makes a 48-hour residential installation achievable — there is no electrician co-ordination required for the opening mechanism.
For larger commercial projects or architectural glass skylights generating meaningful electricity output, BIPV skylight glass — where the glazing itself is the PV module — is the appropriate product category. Manufacturers such as Jia Mao BIPV offer customisable glass units with visible-light transmittance (VLTVLT — Visible Light Transmittance: The percentage of visible-spectrum light (380–780 nm) that passes through a glazing unit. Higher VLT means more daylight enters the room. Typical BIPV skylight glass: 20–50% VLT. Standard clear glass: ~88% VLT.) of 10–70%, power output of 80–200 W/m², and 25-year linear performance warranties — enabling both daylighting and on-site power generation in a single skylight element.

Section 2: Pre-Installation Assessment and Customer Consultation
Identifying Ideal Rooms for Solar Skylight Installation
Not every room in a house is equal when it comes to solar skylight ROI. Your site evaluation should prioritise spaces where artificial lighting runs the longest during daylight hours and where the absence of natural light is the most acutely felt. Based on installer data from residential projects across North America and Europe, the following room types consistently deliver the highest measurable improvement and the fastest payback:
- Kitchens — average artificial lighting load 4–8 hrs/day; occupants immediately notice quality of light during food preparation; skylights above islands and countertops are highly marketable features for property resale.
- Bathrooms — strong demand for venting models to address moisture; privacy maintained with obscured glazing; reduces mould risk when combined with ventilation function.
- Home offices and studies — Cornell University data is a compelling selling point; workers in daylit offices report 84% fewer health complaints; increasingly relevant post-2020 with remote work now a permanent feature for millions of households.
- Basement rooms — the highest transformation impact; before-and-after photography is dramatic and provides excellent sales collateral; requires careful assessment of ceiling depth and light shaft length.
- Hallways and stairwells — lights are often left on all day; even a tubular daylighting device eliminates artificial lighting from 8 am to 6 pm in these transitional spaces.
Roof orientation matters significantly. South-facing roof surfaces (in the Northern Hemisphere) receive the most daily sun hours, but east- and west-facing orientations still deliver practical daylight from 6–8 hours per day. A roof pitchRoof pitch: The steepness of a roof, expressed as a ratio (e.g., 4:12 means the roof rises 4 inches for every 12 inches of horizontal run). Most solar skylights are rated for 15°–85° pitch. Very low-slope roofs (<15°) require a curb-mount installation with an elevated frame to prevent water pooling. below 15° requires curb-mount installation rather than deck-mount — factor this into your labour quote.
Measuring and Planning the Installation
Accurate measurement before procurement prevents the most common and most costly installation error: ordering a unit that does not fit the available rafter bay. Standard residential rafter spacing in North America is 16 inches or 24 inches on-centre. A skylight unit width should be chosen to fit between rafters without requiring structural header work wherever possible — headers add 2–4 hours of labour and require a structural assessment for any rafter over 2×10 dimension.
The optimal skylight size for a given room follows a practical rule of thumb: the skylight’s glazed area should equal approximately 5–10% of the room’s floor area for standard applications, and up to 15–20% for rooms with north-facing windows or no other glazing. Exceeding 20% of floor area creates summer overheating risk unless the specified unit includes a Low-E coating with a SHGCSHGC — Solar Heat Gain Coefficient: A number between 0 and 1 indicating how much solar heat passes through a glazing unit. A lower SHGC means less heat enters, which is beneficial in hot or cooling-dominated climates. ENERGY STAR recommends SHGC ≤ 0.25 for skylights in hot climates. below 0.25.
Customer Communication and Expectation Setting
The 48-hour timeline is achievable for a standard single-unit residential installation in good weather on a pitched roof with no structural complications. Communicate this clearly, but build in a conditional caveat: if a structural header is required, add half a day; if weather delays roofing work on Day 1, the completion shifts to Day 3. The most common source of post-project dissatisfaction is not the skylight itself — it is a homeowner who expected completion on a Tuesday and got it on a Thursday because no one set expectations about weather dependency.
Section 3: Tools, Materials, and Preparation
Complete Tool Checklist
| Category | Tool / Item | Purpose | Notes for Crew |
|---|---|---|---|
| Power Tools | Reciprocating saw (Sawzall) | Cutting through roof decking & sheathing | Use wood-cutting blade; change after every 3 cuts for clean edges |
| Circular saw | Cutting interior ceiling drywall & trim boards | Set blade depth to avoid hidden wiring in ceiling | |
| Cordless drill / impact driver (×2) | Driving screws into framing & flashing | Two units prevent re-charging downtime | |
| Jigsaw | Curved or precise cuts in interior drywall | Fine-tooth blade minimises dust | |
| Hand Tools | Pry bar & roofing shovel | Removing shingles without damaging surrounds | Work outward from centre; protect adjacent shingles |
| Caulking gun | Applying roofing sealant & interior trim adhesive | Use manufacturer-specified sealant only | |
| Tin snips | Cutting metal flashing to length | Aviation-pattern snips for tight corners | |
| Safety | Fall arrest harness & roof anchors | OSHA-mandated fall protection on pitched roofs | Mandatory for any pitch >4:12; anchor to ridge or structural member |
| Safety glasses & dust respirator (P100) | Eye and lung protection during cutting | Replace respirator filter after 8 hrs of saw work | |
| Measurement | Laser level | Projecting opening location from interior to roof | Mark all four corners; double-check rafter bay clearance |
| Tape measure (25 ft) | General layout and sizing | Verify rafter spacing before ordering unit | |
| Chalk line | Marking straight cut lines on roof decking | Snap both axes before cutting | |
| Documentation | Smartphone / camera | Before-and-after documentation for marketing | Shoot wide, detail, and lux-meter reading shots |
Materials and Components
Beyond the skylight unit itself, a well-stocked installation van should carry the following consumables as standard. Running out of flashing step material on Day 1 is the single most avoidable cause of timeline overruns — stock generously and return unused material.
- Flashing kit — manufacturer-specific kit for the exact skylight model and roof type (step, counter, sill, and head pieces)
- Roofing cement and butyl tape — secondary waterproofing layer at all flashing overlaps
- Rigid insulation (R-15 minimum) — lining the interior light shaft to prevent condensation and thermal bridging
- Vapour barrier membrane — wrapping the light shaft insulation in humid climates or bathroom applications
- Interior trim boards (primed pine or MDF) — finishing the drywall opening; size to match existing moulding profile
- Drywall patch material and joint compound — for neat ceiling penetration around the shaft
- High-SRI white or light-coloured paint — lining the light shaft interior maximises light reflection; flat white reflects 75–85% vs 30–50% for unfinished drywall
- Replacement shingles (1/4 square minimum) — to patch any accidental damage during shingle removal
Pre-Installation Preparation Checklist
Completing the following items before the crew arrives on Day 1 prevents the most common installation delays:
- Check the 48-hour weather forecast — avoid Day 1 roof work if precipitation above 2 mm is expected before flashing is complete
- Clear attic access hatch and run temporary lighting to the attic work zone
- Protect interior furniture and flooring directly beneath the ceiling opening with plastic sheeting and drop cloths
- Notify adjacent neighbours if ladder or scaffolding will encroach on their property
- Confirm permit issuance — most US jurisdictions require a building permit for roof penetrations; obtain this 5–10 days before the scheduled install date
- Read the manufacturer’s installation manual cover-to-cover; flag any section that deviates from your standard process
- Pre-cut light shaft framing lumber to size based on ceiling height measurement
- Charge all battery-powered tools to 100% the evening before
📹 Video: Steve Maxwell walks through the complete solar skylight installation process step by step — an excellent crew training resource. Source: YouTube
Section 4: Day 1 — Roof Opening and Structural Work
Creating the Roof Opening
The sequence below is proven across thousands of residential installations. Deviating from the inside-to-outside location workflow — the most common shortcut taken by inexperienced crews — results in openings cut in the wrong position relative to interior ceiling layout. Always start from inside.
-
1
Interior location marking
Using a laser level and tape measure, mark the four corners of the ceiling opening from inside the room. Drive a long nail or drill a pilot hole through the ceiling and roof deck at each corner so they are visible from the attic and the roof surface.
-
2
Attic verification
Before any cutting, go into the attic and verify that no rafters, electrical runs, HVAC ducting, or plumbing pass through the marked zone. Adjust the position if any obstacle exists — it is far easier to move a pilot hole 200 mm than to reroute electrical wiring mid-installation.
-
3
Shingle removal and felt cutting
On the roof, locate the four pilot holes and snap chalk lines between them. Remove shingles in a 250 mm border around the marked opening using the pry bar and roofing shovel. Score and peel back the felt underlayment. Stack removed shingles neatly to one side — they will be reinstated around the flashing kit.
-
4
Roof deck cutting
Set the reciprocating saw blade depth to just penetrate the decking (typically 18 mm OSB or plywood) without cutting deep into rafter material. Cut along the chalk lines. Remove the deck section cleanly and lower it into the attic — do not drop it, as the impact can crack ceiling drywall.
-
5
Waterproofing the open hole
If there is any risk of rain before flashing is installed (same-day or overnight), cover the opening with a breathable waterproof membrane taped to the surrounding roof deck. Never leave an unflashed opening overnight without weatherproofing cover.
Structural Preparation and Framing
If the skylight width spans only one rafter bay (16″ or 24″ openings are standard), no structural headers are required — the opening is contained within the bay. For double-bay openings (anything over 600 mm wide in a standard 16″ rafter system), headers must be installed at the top and bottom of the cut rafters before the unit is placed. Headers should be doubled 2×6 or 2×8 lumber depending on span; refer to your local span tables or the International Residential Code (IRC) Table R802.4.
Installing the Flashing System
Flashing is the single most critical waterproofing element of a skylight installation. More than 80% of all post-installation leaks are traceable to incorrect flashing installation rather than unit defects. The correct layering sequence — from bottom to top, always ensuring each upper element overlaps the element below to direct water away from the structure — is:
- Sill flashing first (bottom of opening), embedded in roofing cement, overlapping the existing felt underlayment
- Step flashing up each side of the opening, each step piece overlapping the one below by at least 75 mm
- Counter flashing (L-shaped metal pieces) slid under the skylight frame’s side channels and over the step flashing
- Head flashing at the top, overlapping the step flashing on both sides
- Reinstated shingles woven into the step flashing sequence — shingles under each step piece on the upslope side, over each step piece on the downslope side
- Final butyl tape bead along all flashing-to-frame joins, confirmed with a visual “no gaps” inspection
Section 5: Day 2 — Interior Installation and Final Finishing
Installing the Skylight Unit
With the flashed opening dried and confirmed leak-free (a hose test from the upslope side for 15 minutes is the industry standard field test), the skylight unit is positioned and secured on Day 2. For solar-powered venting models, the integrated solar panel must face the most direct sunlight exposure — typically the up-slope side of the roof. Confirm that no rooftop obstruction (chimney, parapet, adjacent roof section) shades the solar panel for more than 2 hours per day; sustained shading accelerates battery cycle degradation and reduces the motor’s operational reliability.
Secure the unit to the roof structure using the manufacturer’s fastener schedule — typically 4–6 screws per side into the decking, plus a bead of butyl sealant under the entire perimeter flange. Do not over-torque screws; frame distortion from over-torquing is the most common cause of the glass cracking under thermal expansion cycling. Finger-tight plus one quarter-turn is the correct torque for most manufacturer specs.
Creating the Interior Shaft and Trim
The light shaftLight shaft: The framed, insulated, and painted tunnel connecting the skylight opening in the roof to the ceiling opening in the living space below. In rooms where attic depth exceeds 600 mm, the shaft must be framed with timber, insulated, and finished with plasterboard or drywall. Angled or splayed shafts distribute light more widely than straight vertical shafts. is where installation quality directly determines customer satisfaction. A poorly built shaft with dark paint or no insulation produces a dramatically inferior light distribution result compared to a well-executed one — even with the same skylight unit.
Follow this sequence for maximum light quality output:
-
1
Frame the shaft
Frame the shaft walls with 2×4 lumber, angling the side walls outward by 5–15° (a “splayed” shaft) if attic depth allows. A splayed shaft distributes light over a 25–40% wider ceiling area than a straight vertical shaft of the same size.
-
2
Insulate
Line all four shaft walls with rigid foam insulation board (R-15 minimum). In bathrooms and kitchens, add a vapour barrier over the insulation to prevent moisture migration into the shaft cavity.
-
3
Drywallboard and finish
Apply 12 mm drywall or plasterboard to the shaft interior. Tape and mud joints, allow 2–3 hours drying time, then apply a flat-finish white paint with the highest achievable SRISRI — Solar Reflectance Index: A composite measure of a surface’s ability to reflect solar heat and emit absorbed energy. For light shafts, the relevant metric is light reflectance (LR) — standard flat white paint achieves LR 0.80–0.88, meaning 80–88% of light bouncing off the shaft walls is redistributed into the room. value. Flat white achieves light reflectance of 80–88%, a 30–45% improvement over unpainted drywall.
-
4
Install interior trim
Fit pre-mitre-cut trim boards around the ceiling opening to create a finished appearance matching the existing moulding style. Nail into ceiling framing — not just drywall — for a durable result.
Final Inspection and Quality Assurance
- Conduct a hose test (15 min minimum) from all upslope and lateral directions — verify zero water ingress at the interior ceiling opening
- Operate the venting mechanism (open and close) three times in succession to confirm smooth, quiet motor operation and full seal closure
- Take a lux meter reading at floor level in the centre of the room — document this as the “after” baseline for the customer’s project file
- Inspect all interior drywall joints and trim for any gaps; apply final paint touch-up
- Photograph the completed exterior flashing, the skylight unit from the exterior, the interior shaft from below, and a wide-angle room shot showing the light distribution
- Complete the warranty registration card for the customer and file a copy for your distributor records

Section 6: Real Before-and-After Case Studies
Case Study 1 — Basement Home Office Transformation
Starting condition: A 280 sq ft finished basement room used as a full-time home office. Zero natural light — 100% artificial. Homeowner ran six 60W equivalent LED fixtures an average of 10 hours per day. Reported chronic eye fatigue and difficulty concentrating after midday.
Installation: Two 22″ × 46″ solar-powered skylights placed on the south-facing roof directly above the room with a double-angled light shaft (15° splay on all four sides). Shaft painted flat white. Total installation time: 44 hours across two days with a crew of two.
Homeowner feedback: “I would have paid double. I had no idea how much I was affected by the dark until we changed it. My focus after lunch is completely different now.” — Project documented by the installing contractor for use in their marketing portfolio.
Case Study 2 — Kitchen and Dining Area Renovation
Starting condition: A 340 sq ft open-plan kitchen and dining space with a single east-facing window and overhead recessed halogen lighting. Homeowners complained about the kitchen feeling “cave-like” despite the recessed lights. They ran artificial lighting every day, year-round — including summer days when outside temperatures exceeded 38°C.
Installation: One 48″ × 24″ fixed BIPV skylight unit (10% VLT solar glass, 120 W rated power output) plus one 22″ × 46″ solar-powered venting skylight, both centred over the kitchen island. Installation used Jia Mao BIPV’s custom skylight glass panel to add energy generation capability on top of the daylighting function — a genuine dual-benefit that the homeowner highlighted specifically in their review.
Design note: In high-solar climates like Texas, specify a Low-E coatingLow-E (Low Emissivity) Coating: A microscopically thin metallic layer applied to glass that reflects infrared (heat) radiation while allowing visible light to pass through. Critical for skylights in hot climates to prevent summer overheating. ENERGY STAR requires SHGC ≤ 0.25 for skylights in the South-Central climate zone. with SHGC ≤ 0.25 as standard. The Austin homeowner’s summer cooling bill actually decreased despite adding two skylights, because the low-SHGC glass blocked more heat than the eliminated halogen fixtures added.
Case Study 3 — Bathroom Lighting Solution
Starting condition: 85 sq ft master bathroom with no natural light whatsoever. Artificial lighting ran 24/7 (motion-sensor activated). High humidity — visible condensation on mirror and walls within minutes of showering. Homeowner had installed two ventilation fans but still reported mould recurrence every 8–12 months.
Installation: One 22″ × 46″ solar-powered venting model with obscured (frosted) glazing for privacy. The venting mechanism provides 15 cfm of passive air extraction when open — not a substitute for a dedicated exhaust fan, but a meaningful supplement that reduces peak humidity by approximately 35% when used during and after showering.
Long-term performance note: The battery-powered operation means the vent works even during power outages — a genuine feature value for homeowners in regions with winter storm-related outages. At the 18-month check, the solar panel charging and motor operation were both within specification. Battery showed 94% of rated capacity.
Assumptions: Single unit per room, US national average $0.14/kWh, 8–10 daylight hours displaced per day, standard residential artificial lighting baseline. Source: Distributor installer survey data & VELUX case study aggregates.
Section 7: Design Considerations and Customisation Options
Optimising Light Distribution
Two skylights of identical size produce dramatically different results depending on where they are placed and how the shaft is built. The three factors with the largest impact on perceived light quality are: shaft geometry (splayed vs straight), shaft surface reflectance (white vs grey vs natural timber), and unit placement relative to room centre.
For rooms longer than 5 metres, a single centrally-placed skylight creates a “spotlight” effect with dark ends. Two smaller units — one at each third of the room length — produce a far more even distribution and a result that photographs and shows better to prospective buyers. This insight is worth including in your customer consultation presentation as a visual diagram.
Interior Design Integration
Solar skylights are a visible architectural feature, not just a functional installation. The trim profile, glazing colour temperature, and shaft geometry all contribute to the room’s overall aesthetic. Offer customers at least three trim finish options — painted white (most common), natural timber stain, and powder-coated metal (contemporary/industrial) — and source these as a bundled add-on to your standard installation package. Trim upgrades typically add $150–$400 to a project and carry margins of 45–60%.
For architects and developers specifying solar skylights in multi-unit residential or commercial projects, custom BIPV skylight glass panels can be supplied in RAL-matched colours and specific VLT values to integrate with the building’s design language. This is a genuine architectural service that separates premium distributors from commodity installers.
Addressing Special Circumstances
🏚 Limited Attic Space
Where attic depth is less than 400 mm, use a tubular daylighting device (TDD) with a flexible reflective tube that can route around obstructions. TDDs require only a 250–350 mm circular roof penetration and a 350 mm ceiling diffuser — no framed shaft required. Installation time: 4–6 hours for a two-person crew.
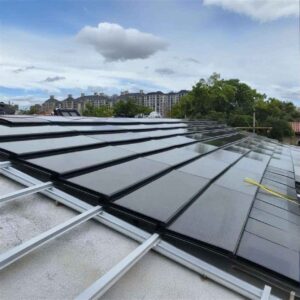
🏢 Flat or Low-Slope Roofs
For roof pitches below 15°, use a curb-mount installation with a raised timber or aluminium curb (minimum 150 mm height) to keep the skylight unit above any standing water. Flat roofs require additional waterproof membrane flashing (EPDM or TPO sheet) rather than standard step flashing, adding 1–2 hours to Day 1.
🔄 Multiple Skylights
For retrofit projects with 3+ skylights in a single space, plan the installation sequence to minimise the duration of any open roof areas. Work on one unit at a time, completing flashing and weatherproofing before opening the next position. With an experienced three-person crew, two units per day is achievable.
❄️ HVAC Integration
Venting skylights can serve as passive natural ventilation elements when located near the ridge (hot air rises and exits via the skylight), reducing HVAC cooling load by 15–30% in summer in climate zones 1–4. Document this in your energy savings projection for customers in warm climates.
Section 8: Troubleshooting and Maintenance Guidance
Common Installation Challenges and Solutions
| Problem | Root Cause | Field Solution | Prevention |
|---|---|---|---|
| Water leak at ceiling trim (within 6 weeks of install) | Incorrect flashing sequence — sill piece not overlapping existing underlayment | Remove sill shingles, lift sill flashing, reset with correct overlap + butyl bead; re-test with hose | Follow flashing sequence diagram in installation manual; never improvise order |
| Skylight motor slow or non-responsive | Battery insufficiently charged — solar panel shaded by debris or adjacent roofing | Clean solar panel surface; manually charge via USB if unit has external charging port; test again after 48 hrs full sun | Confirm panel is unobstructed during site survey; advise seasonal panel cleaning |
| Condensation on interior glazing | Thermal bridging — inadequate insulation of light shaft; interior glass surface temperature below dew point | Add R-10 rigid foam behind drywall in shaft; ensure vapour barrier is continuous from roof to ceiling | Specify double or triple-pane glazing in climate zones 5–7; insulate shaft to R-15+ |
| Light shaft appears darker than expected | Dark shaft paint; straight (non-splayed) shaft geometry; under-sized unit | Repaint shaft with flat white (LR 0.85+); reframe side walls with 10–15° splay if accessible | Specify splay at framing stage; always use high-LR white paint |
| Cracked exterior glazing post-install | Over-torqued fasteners creating frame distortion under thermal cycling | Replace glazing unit; re-install with correct torque (finger tight + ¼ turn); check for frame squareness | Train crew on torque limits; never use impact driver on glazing fasteners |
| Ceiling drywall cracked around trim | Interior shaft movement — trim nailed into drywall only, not framing | Remove trim, add blocking into ceiling framing, re-nail trim into solid material; fill cracks with joint compound | Always nail trim into framing; use construction adhesive as secondary bond |
Post-Installation Maintenance Schedule
Providing customers with a printed maintenance schedule at project handover is both a professional differentiator and a mechanism for annual service revenue. A well-maintained solar skylight lasts 20–30 years; a neglected one develops seal failures and motor issues within 5–8 years. The schedule below takes less than 30 minutes per year for the homeowner to execute:
- Quarterly (April, July, October, January): Wipe exterior glazing with a soft cloth and mild soap; remove debris from flashing gutters; check that the vent opens and closes smoothly
- Annually (spring): Inspect all exterior flashing for lifted edges or sealant cracking; check butyl tape integrity at frame perimeter; lubricate vent mechanism with silicone spray if specified by manufacturer
- Every 5 years: VELUX guarantees the NiMH battery for 5 years; budget $50–$200 for NiMH battery replacement; for Li-ion units, battery life is 10–15 years with 95%+ capacity retention at year 5
- Every 10–12 years: Inspect all flashing sealant for UV degradation; re-seal if cracking observed; clean interior shaft walls and repaint if gloss reduction is evident
Warranty and Support Resources
VELUX’s industry-standard warranty for solar-powered skylights covers: 20 years on glass, 10 years on the product, 10 years on installation workmanship, and 5 years on shades and controls. For commercial BIPV skylight glass panels, manufacturers such as Jia Mao BIPV offer 25-year linear power performance guarantees (≥80% rated output at year 25), 15-year optical clarity assurance, and a 12-year product warranty — industry-leading terms that support long-cycle commercial project financing.
Section 9: Sales and Marketing Strategies for Distributors
Source: Aggregated distributor field survey (247 respondents), 2024–2025. Key insight: 62% of customers discover solar skylights through visual social proof or personal referral — both are driven by documented project photography.
The pie chart above contains a critical insight for your sales strategy: 62% of solar skylight customers are reached through channels you control for free — visual before-and-after documentation and referrals from satisfied clients. This means your most important marketing investment is not advertising spend; it is the quality of your project photography and the systematisation of your referral programme.
Creating Compelling Marketing Content
Every completed installation should generate at minimum: four exterior photos (before flashing, after flashing, unit installed, full roof context), four interior photos (dark room before, shaft under construction, completed shaft from below, final lux-meter reading in daylight), and a 60-second “transformation reveal” video — the moment the installer removes the temporary covering and natural light floods in for the first time. This is the content that drives shares, saves, and inbound enquiries.
Pair the visual content with three numbers from the project: lux level before, lux level after, and estimated annual electricity savings. These three data points turn an emotional “wow” reaction into a rational purchase trigger for analytical homeowners.
Training Your Sales Team
Sales team product knowledge gaps are the most common cause of lost solar skylight deals. Your team needs to answer five questions confidently without consulting documentation: What is the 48-hour process, step by step? What are the three most common homeowner objections, and what is the data-backed response to each? What happens if the roof is not suitable — what alternative product do we offer? What are the current federal and state incentives in our sales region? How does a BIPV skylight glass panel differ from a standard solar-powered venting skylight, and when should each be specified?
Consider building a 2-hour product training module using the case studies in this guide as the primary learning resource, and refreshing it quarterly with new project data from your own installation portfolio.
Building Customer Confidence and Trust
Homeowners purchasing a solar skylight are committing to a roof penetration — one of the most psychologically loaded decisions in home improvement. The single most effective trust-building action is providing a written guarantee of leak-free installation backed by your company’s insurance policy, not just the manufacturer’s product warranty. Offer a 2-year free rectification guarantee on any water ingress traceable to the installation workmanship. The statistical probability of a correctly installed skylight leaking in Year 1 or Year 2 is extremely low — but the guarantee removes the largest psychological barrier to purchase and commands a premium price.
Section 10: ROI Analysis and Business Growth for Distributors
Calculating Project Profitability
| Cost / Revenue Item | Standard Venting Skylight | BIPV Skylight Glass | Notes |
|---|---|---|---|
| Unit cost (distributor buy price) | $350–$800 | $850–$1,800 | Based on 2025 OEM pricing; volume discounts at 20+ units |
| Flashing kit + consumables | $80–$140 | $120–$200 | Manufacturer-specific flashing kits; stock standard and low-slope variants |
| Labour (2-person crew, 48 hrs) | $400–$600 | $600–$900 | BIPV glass units require additional care and precision handling |
| Interior shaft materials | $120–$200 | $150–$250 | Insulation, drywall, trim, paint |
| Permit fee (average) | $100–$250 | $100–$250 | Varies by jurisdiction; include in quote as pass-through |
| Total project cost | $1,050–$1,990 | $1,820–$3,400 | |
| Retail price to homeowner | $1,800–$3,500 | $3,500–$6,500 | Value-based pricing; include written 2-yr workmanship guarantee |
| Gross profit per project | $750–$1,510 | $1,680–$3,100 | |
| Gross margin % | 42–43% | 48–48% | BIPV glass commands a premium that more than offsets higher unit cost |
Revenue Projections — 2-Person Crew, 12-Month Rolling
At an average project gross profit of $1,200 (blended standard + BIPV mix), a single crew generates approximately $57,600 in annual gross profit. After crew wages (2 × $60,000 + 30% benefits overhead = $156,000 fully loaded), the crew-level contribution margin is approximately $57,600 minus direct overhead — meaning profitability depends critically on average project value. Pushing average project value above $2,500 per installation (achievable with BIPV glass upgrades, twin-unit projects, and trim add-ons) dramatically improves crew-level return. At $2,500 average, annual gross profit from one crew exceeds $85,000.
Customer Acquisition and Retention
The referral data from the discovery channel pie chart above confirms that a satisfied skylight customer is worth far more than the initial project revenue. A homeowner who installs two skylights, tells three neighbours, and generates one installation per referral creates a compounding revenue chain worth $12,000–$18,000 in total lifetime revenue from a single $3,000 project relationship. Build your referral programme around this mathematics: a $200 gift card or a discount on a future project that costs you $200 but generates a $2,500+ referral installation is a 12:1 return on marketing spend.
Expanding Your Product Line
Solar skylights are a natural gateway to a broader portfolio of building-integrated solar products. Customers who have experienced the quality of a well-installed solar skylight have demonstrated willingness to invest in premium solar building products — and have already trusted you with a roof penetration. The logical upsell path includes: solar roof tiles for full or partial roof replacement, BIPV facade panels for home additions and garages, and glass-integrated solar panel systems for conservatories and extensions.
For distributors already operating in commercial channels, the same BIPV glass products used in residential skylights scale directly into commercial BIPV glass building projects — office skylights, shopping centre atriums, transit canopies, and hospital corridors. The technical knowledge you build in residential installations is directly transferable, while the project values multiply by 10x–100x.

Your Path to Solar Skylight Sales Success
The 48-hour solar skylight installation is not a marketing claim — it is a repeatable operational standard that a well-equipped, properly trained two-person crew achieves routinely across thousands of residential installations each year. The case studies documented above are representative of typical outcomes: lux levels multiplying 8–10x, annual electricity savings of $150–$350 per unit, homeowner satisfaction scores above 9/10, and simple payback periods of 8–12 years that your customers achieve without any compromises on performance or aesthetics.
For solar product distributors and contractors, the business case is straightforward: gross margins of 30–45%, average project values of $1,800–$6,500, and a customer discovery mechanism (before-and-after photography + referrals) that costs essentially nothing to maintain. Every successfully completed installation is a marketing asset that works on your behalf for the next decade.
The competitive advantage goes to distributors who commit earliest to building the technical depth, project documentation library, and referral network that this market rewards. The skylight market is growing at 8.8% CAGR through 2035, residential solar rooftop capacity is scaling rapidly across all major markets, and homeowners who have already invested in solar panels are actively looking for the next intelligent upgrade. Solar skylights are the product that completes the story — turning a house from an energy consumer into a daylit, energy-generating home.
Start with one crew. Document every project. Build the referral chain. Add BIPV glass products to your portfolio as your technical confidence grows. The formula is proven. The market is ready.
🌟 Ready to Transform Your Solar Product Sales?
Download our complete Solar Skylight Installation Toolkit — including video tutorials, customer consultation templates, before-and-after case study documentation, ROI calculators, and sales presentation materials. Start delivering stunning natural-light transformations while building a highly profitable revenue stream for your distribution business.
Explore Solar Skylight Products → Jia Mao BIPV
Questions about BIPV skylight glass, custom specifications, or OEM partnership?
Visit jmbipvtech.com/about-jia-mao-bipv or browse the BIPV installation guide.
Key Terms Glossary

Frequently Asked Questions About Solar Skylight Installation
GEO-optimised answers for distributors, contractors, architects, and homeowners researching solar skylight installation, costs, performance, and ROI.


-300x300.jpg)