
裏庭のパティオは、1年に約8,600時間、つまり誰もその上に立っていない日中のすべての時間、未使用のまま放置されています。その間、パティオは太陽放射を吸収し、それを廃熱として反射しています。 「歩行可能なソーラータイル」は、この受動的な表面を能動的なエネルギー資産へと変え、パティオがもともと受けていたのと同じ日光から電力を生成します。アリゾナ州フェニックスで、1日あたりの平均日射量が5.7 kWh/m²の場所に20 m²のシステムを設置した場合、約 年間1,600~1,900 kWh — これは、1世帯の年間照明消費電力を相殺できるほどであり、あるいは電気自動車を年間5,000~6,000マイル走行させるのに十分な量です。.
しかし、従来の舗装材を敷設する場合と、人が裸足で歩いたり、子供たちが遊んだりし、雨や雪、灌漑用水が定期的に染み込む表面の下に、通電中の電気回路を備えた太陽光発電舗装材を敷設する場合とでは、決定的な違いがあります。 防水処理の不備は感電の危険を招く可能性があります。不適切な排水は路盤を損ない、タイルにひび割れを生じさせる恐れがあります。許可を取得していない場合、住宅所有者保険が無効になる可能性があります。また、滑り止め性能の仕様を誤って選択すると、濡れたパティオが法的責任の原因となる恐れがあります。.
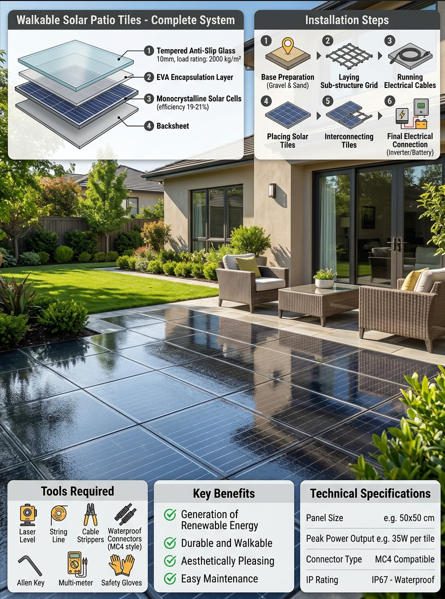
このガイドでは、裏庭のパティオに歩行可能なソーラータイルを組み込む際の、技術的および実務的なあらゆる側面について解説しています。初期の目標設定や現場調査から、防水対策、電気工事基準への準拠、耐荷重試験、設置手順、そして長期的なメンテナンスに至るまでを網羅しています。 各セクションでは、「クリーンエネルギー」や「持続可能性」といった一般的な主張ではなく、公表されている製品仕様、建築基準法の要件、および現場での設置データに基づいて解説しています。“
目標と制約の評価
ソーラータイルパティオの性能目標を定める
製品を選定したり、業者に依頼したりする前に、パティオに何を期待しているのかを具体的に明確にしておきましょう。 性能目標は通常、エネルギー生産量(kWh/年)、景観との調和(色、質感、模様)、機能的な耐久性(通行頻度、家具の荷重、天候への曝露)の3つのカテゴリーに分類されます。これらの目標は、製品の選定、路盤の設計、および予算を直接決定づける要素となります。.
年間10,000 kWhを消費する家庭が、電気代の15%分を相殺したい場合、パティオからの年間発電量は約1,500 kWh必要となります。 歩行可能なタイル型パネルの一般的なモジュール効率である10–15%(従来の屋上用パネルの20–22%と比較して)の場合、 平均日射量が4.5~5.5 kWh/m²/日の場所で、日陰のないタイル表面積がおよそ18~25 m²必要となります。パティオの面積が15 m²しかない場合は、エネルギー目標を下方修正するか、あるいは 従来の屋上パネル その差を埋めるために。.
ベンダーと契約を結ぶ前に、具体的かつ測定可能な目標を明記しておきましょう。具体的には、年間発電量(kWh)、許容可能なタイルの最大厚さ(隣接する表面への移行に影響する)、必要な滑り抵抗等級(DCOFまたはASTM規格)、設計荷重(PSIまたはkg単位の点荷重)、および外観に関する仕様(ガラスの色、セルの視認性、エッジのプロファイル)などです。 これらは、すべての製品および入札を評価するための仕様書となります。.
予算、スケジュール、および保守に関する要件
歩行可能なソーラータイルは、従来の舗装材や屋上用ソーラーパネルに比べ、1平方メートルあたりの価格が大幅に高くなります。以下のようなメーカーが公表している価格に基づくと、 PLATIO Solar, 歩行可能なソーラー舗装材の価格は 1個あたり50~80ユーロ (約$55~$90米ドル)、これはタイル代だけで1m²あたりおよそ$150~$250に相当します。これには、下地処理、電気工事、防水工事、および人件費は含まれていません。 20 m²のパティオを完全に施工する場合、現場の複雑さや現地の労働賃金に応じて、総額は通常$6,000~$12,000となります。.
これを、$15の従来のコンクリート舗装材と比較すると–$30/m²の設置コストや、標準的な屋上太陽光発電($150–$200/m²)と比較してみてください(ただし、効率の高さと最適な傾斜角により、1m²あたり40–60%多くのエネルギーを生産します)。 この歩行可能なタイルの価値は、単なるエネルギー経済性だけにあるわけではありません。パティオとしてすでに割り当てられていた空間の二重利用、屋根への貫通工事の不要化、そして多くの住宅所有者が好む美的調和にあるのです。.
維持費は手頃です。専門業者による清掃や点検には、年間$100~$200の費用が見込まれます。また、衝撃による損傷が発生した場合は、タイル1枚あたり$80~$150の交換費用が時折発生します。予想される耐用年数は 20~25年 太陽光発電部品については、下地と防水処理が健全な状態を維持していれば、ガラスとフレーム構造は30年以上持ちます。.
既存の景観や屋外構造物との調和
歩行可能なソーラータイルは、芝生の縁、プールデッキ、花壇、階段、既存のコンクリートスラブなど、隣接する表面と滑らかに接続する必要があります。6 mmを超える高低差があると、つまずきの危険が生じ、ADA(米国障害者法)に準拠しなくなります。 タイルの厚さ(メーカーによって異なりますが、通常40~65 mm)は、既存の地面の高さに合わせるか、あるいは下地を掘削してタイル組立に対応させる必要があります。これにより、パティオの視覚的・機能的な流れを妨げるような段差が生じないようにします。.
既存の日よけ構造物(パーゴラ、オーニング、成木など)は、発電量を比例して減少させます。 パティオ面積の40%を覆うパーゴラは、発電可能量をおよそ40%分減少させます。これは必ずしもプロジェクトが不適格になることを意味するわけではありません。つまり、エネルギー生産目標を設定する際には、パティオの総面積ではなく、実際に日陰になっていない面積を考慮しなければならないということです。.
「歩行可能なソーラータイル」技術の理解
「歩行可能なソーラータイル」とは何か、その仕組み
「歩行可能なソーラータイル」とは、構造用舗装面と発電装置の機能を同時に果たすように設計された、建築物一体型太陽光発電(BIPV)モジュールです。 各タイルには、通常、セル効率15~22%の単結晶シリコン製太陽電池が、強化された滑り止めガラス層と頑丈な構造フレームの間にラミネートされています。 太陽光がガラス表面に当たると、セルは直流(DC)電力を発生させ、これはマイクロインバーターによって交流(AC)に変換され、建物の電気系統に供給されるか、または電力網に送電されます。.
その Jia Mao Bipv 太陽光発電フロアタイル生産ライン この技術の現状を如実に表している。15%モジュール効率において、1枚あたり30~40Wの発電能力を持つ単結晶セルを採用し、滑り止め加工が施されたテクスチャード強化ガラスは、定格で 10,000 PSIの圧縮強度, 、IP68規格に準拠した防水ジャンクションボックス、およびシステム全体の停止を必要とせずに個々のタイルを交換できるモジュール式の電気設計を採用しています。これらのタイルは、ASTM D2047の滑り抵抗要件を満たしており、車椅子での利用も含め、継続的な歩行者通行に対応するよう設計されています。.

従来の屋上設置型や地上設置型太陽光発電との違い
歩行可能なソーラータイルと従来のパネルには、3つの根本的な技術的な違いがあります。第一に、標準的な屋上用パネルのガラスが3.2 mmであるのに対し、歩行者や家具の荷重に耐え、たわまないよう、ガラスは十分な厚さ(通常は8~12 mmの合わせガラス)でなければなりません。 第二に、表面は濡れた状態でも滑りにくいものでなければならない。これは、意図的に人が歩くことのない屋上用パネルには求められない要件である。 第三に、設置角度は0°(水平)に固定されているため、同じ場所にある最適な傾斜角度で設置された屋上パネルと比較して、発電量が約10~15%減少する。.
『』に掲載された研究論文によると、 エネルギー変換と管理 香港における歩道用「歩行可能な」太陽光発電床タイルの開発と試験について報告し、太陽エネルギー変換効率、滑り止め性能、耐熱性において満足のいく性能が確認された。これにより、実際の歩行者環境における本技術の有効性が実証された。.
歩行可能なソーラータイル vs. 屋上設置型パネル vs. 地上設置型システム
| パラメータ | 歩行可能なソーラータイル | 屋上パネル | 地上設置型システム |
|---|---|---|---|
| モジュールの効率 | 10–15% | 20–22% | 20–22% |
| 傾斜角 | 0°(水平) | 15~45°(最適化済み) | 15~45°(調整可能) |
| 耐荷重 | 400~10,000+ kgの集中荷重 | 歩行者用には設計されていません | 歩行者用には設計されていません |
| 滑り抵抗 | ASTM D2047 / DIN R11–R13 | 該当なし | 該当なし |
| ガラスの厚さ | 8~12 mm 積層 | 3.2 mm 強化ガラス | 3.2 mm 強化ガラス |
| 防水のニーズ | 重大(地表水への曝露) | 屋根の防水処理が必要 | ミニマル |
| 設置費用(m²あたり) | $150–$250(タイルのみ) | $100–$150(パネルのみ) | $80~$130(パネルのみ) |
| デュアルユースの価値 | 舗装材の代替品 | なし(既存の屋根の上に設置) | 庭のスペースを占有する |
| 1平方メートルあたりのエネルギー量(年間、中緯度地域) | 80~130 kWh | 150~220 kWh | 160~230 kWh |
パティオデザインにおける美観と統合の選択肢
最新の歩行可能なソーラータイルには、さまざまな種類のガラス(透明、オパール、着色)、セルカラー(黒、青)、フレーム素材(再生プラスチック、アルミニウム、コンクリート複合材)が用意されています。. オニキス・ソーラーの「歩ける」太陽光発電フロア プロジェクトの美観に合わせつつ、エネルギー性能を維持できるよう、モジュールのサイズ、表面の質感、透明度、色をカスタマイズ可能です。PLATIO Solarでは、「ミッドナイトブラック」、「オーシャンブルー」、「クリアガラス」のバリエーションを用意しており、住宅所有者は太陽光発電パネルの表面を、自宅の景観の配色に合わせて選ぶことができます。.
太陽光発電エリアと非太陽光発電エリアの間で視覚的なつながりを滑らかにする必要があるプロジェクトの場合、メーカーは、寸法や表面仕上げが同一でありながら、太陽電池セルを内蔵していない「ダミー」タイルを供給することができます。これらは、日陰が濃い場所や固定家具の下などのエリアで使用され、発電効率の低い場所に太陽光発電用素材を無駄にすることなく、美観を損なわない配置を維持することができます。.
敷地調査とパティオ設計における考慮事項
日照状況と日陰の分布を評価する
パティオの太陽光発電設置場所の評価は、屋上よりも複雑です。これは、地面レベルの面には日陰の原因となる障害物が多く存在するからです。フェンス、隣接する建物、庭の塀、生い茂った木々、さらには住宅所有者自身の屋根のひさしでさえ、一日を通してパティオ全体に影を落とす可能性があります。 日影調査(理想的には、太陽光シミュレーション機能を備えたSketchUpなどのソフトウェアや、携帯型の太陽光経路測定ツールを使用)では、夏至と冬至の日について、午前9時、正午、午後3時の各時間帯におけるパティオ表面の日陰の分布をマッピングする必要があります。.
費用対効果が見込める、歩行可能なソーラータイルの設置において、最低限必要な日照量はおよそ 1日あたり4時間の直射日光(日陰のない状態) 日照量が最も多い時期において。これより日照量が少ないパティオの場合は、従来の舗装材を使用し、別途屋上やカーポートに太陽光発電設備を設置する方が適しています。北半球で南向きのパティオであり、頭上に30フィート以内の遮蔽物がない場所が理想的な条件です。.
地盤条件と荷重分布
砂敷き工法の柔軟性により、路盤のわずかな不均一さを許容できる従来の舗装材とは異なり、歩行可能なソーラータイルには硬質のガラスや電気部品が組み込まれており、これらを曲げるとセルにひびが入ったり、はんだ接合部が破損したりする恐れがあります。そのため、路盤は荷重を均等に分散させ、不均一な沈下を防ぐよう設計されなければなりません。.
歩行可能なソーラータイルのパティオに推奨される路盤構造は、最低でも 4~6インチの締固められた砕石 (ASTM D2940の粒度分布要件を満たすもの)を締固めた原地盤の上に敷き、メーカーの仕様に応じて、その上に1インチの整地用砂またはモルタル床を敷く。 地盤条件は重要です。膨張性粘土質土壌の場合は、より深い掘削が必要となり、粘土が砂利基盤に混入するのを防ぐためにジオテキスタイル製の分離層を設置する必要がある場合があります。砂質土壌は排水性が良好ですが、横方向への移動を防ぐために端部の固定が必要になる場合があります。.
プレートコンパクターは、2インチの厚さの砂利層ごとに、直交する方向で少なくとも2回、転圧を行わなければならない。 目標締固め度は、ASTM D698(標準プロクター法)に基づく最大乾燥密度95%である。締固めが不十分な路盤は、時間の経過とともに不均一に沈下し、タイルのガラスをひび割れさせたり、接合部の防水シールを破損させたりする。これらは、地上設置型ソーラータイル工事において最も一般的な2つの不具合原因である。.
パティオ用資材の適合性と滑り止め性能
歩行可能なソーラータイルの摩擦係数(COF)は、濡れた状態でもその表面が安全であるかどうかを決定する。米国障害者法(ADA)では、静止摩擦係数の最低値を 水平面では0.6、スロープでは0.8. 歩行可能なソーラータイルの多くは、ANSI A326.3規格において動的摩擦係数(DCOF)0.42~0.60、あるいはドイツのDIN 51130規格におけるR11~R13に相当する評価値を達成しており、濡れた状態での歩行にも十分な性能を備えています。.
Jia Mao Bipvの 太陽光発電フロアタイル ASTM D2047規格に準拠したテクスチャード強化ガラスを使用しており、雨を含むあらゆる気象条件下で歩行者に安全な足場を提供します。また、そのセルフクリーニング表面処理により、バイオフィルムや藻類の繁殖も抑制されます。これらは湿度の高い気候下における屋外表面でよく見られる滑り事故の原因ですが、標準的な滑らかなガラスでは十分に防ぐことができません。.
組み込みシステムにおける防水対策

防水シートの選定とその敷設位置
水は、地上の電気設備にとって最大の敵です。人が歩けるソーラータイルのパティオでは、接続ボックスの周囲に水が溜まったり、配管内に水が浸入したり、下地が水で飽和したりすることを防がなければなりません(下地の飽和は、寒冷地では凍上、あらゆる気候帯で浸食を引き起こします)。 防水対策は、パティオが地盤上(土や砂利の上に直接)に設置されるか、構造用デッキ(コンクリートスラブ、屋上テラス)の上に設置されるかによって異なります。.
地表面設置の場合、主な防水対策は、タイルの下に連続した防水膜を敷くことではなく、適切な排水と砂利層の設計にあります。 水は、タイル間の透水性のある目地から排水され、砂利の基礎層を通過して、地盤へと浸透していく必要があります。電気部品(接続箱、配管)は、個別にIP67またはIP68規格に準拠して密閉され、水が溜まらないような排水に適した位置に設置されなければなりません。.
構造用デッキ(高床式パティオ、屋上テラス、バルコニー)への設置の場合、連続した防水膜(通常はTPO(熱可塑性ポリオレフィン)、 EPDM(エチレン・プロピレン・ジエン・モノマー)、あるいは液状ポリウレタン系)——を構造デッキ上に施工し、その上にタイルの台座や支持システムを設置します。この防水シートには、最低でも 2%(1フィートあたり¼インチ) 水たまりができるのを防ぐため、排水口の方へ流すようにしてください。. Sika Sarnafil PVC ディテール用防水シート また、これらの用途では、耐穿刺性と長期的な耐紫外線性を備えていることから、同様の製品が一般的に指定されています。.
タイル周辺の目地や貫通部のシーリング
タイル間のすべての目地は、水が浸入する可能性のある箇所です。目地用シーラントの選定は、予想される動きによって異なります。 コンクリートスラブ上のモルタル床に敷設されたタイルには、剛性のモルタル目地(変位ゼロ)が適していますが、熱膨張により季節ごとに1~3 mmの目地幅の変化が生じる、砂敷きまたは台座支持式の施工には、柔軟性のあるポリウレタンまたはシリコーン系シーラント(±25%の変位吸収能力)が必要です。.
電気配線用貫通部(ケーブルがタイルから出て、下地配管に入る箇所)は、防水において最もリスクの高い箇所です。各貫通部には、IP68以上の規格を満たす圧縮式グランド継手を使用し、シーラント層に埋め込む必要があります。また、一次シールが機能しなくなった場合に備え、その下部に二次排水経路を設ける必要があります。 Jia Mao Bipvフロアタイルシステムは、IP68規格に準拠したジャンクションボックスと、下地内に隠蔽された地下配線を採用することでこの課題に対処しており、歩行者やメンテナンス機器によって損傷を受ける可能性のある露出配線を排除しています。.
エッジの仕上げと周囲の面への接続
ソーラータイル敷設エリアの周囲は、端部の路盤が水によって浸食されるのを防ぐようにしなければなりません。 コンクリート製の縁取り(通常は幅4インチ、深さ8インチで、タイル表面と面一になるように打設されたコンクリート縁石)は、周囲のタイルを固定し、砂利の路盤を囲い込み、隣接する芝生、花壇、またはコンクリート面へと滑らかに接続する役割を果たします。 縁取り部の天面は、タイルの最前列と接する部分に柔軟性のあるシーラントで密閉し、連続した防水境界を形成する必要があります。.
家の壁、階段、その他の垂直面との接合部では、最低4インチのフラッシングの立ち上がりが必要です。防水膜またはシーラントは、豪雨時に予想される最高水位を上回る高さまで垂直面に沿って延ばさなければなりません。 この施工上の詳細は、パティオの設置において見過ごされがちであり、パティオが建物の基礎に隣接している場合、水漏れに関する苦情の大部分の原因となっています。.
電気安全および規格への準拠
地域の電気工事に関する規定および許可要件
建物の電気系統に接続される太陽光発電システム(歩行可能なソーラータイルを含む)については、米国のほぼすべての管轄区域で電気工事許可が必要です。適用される規制は NEC第690条(太陽光発電システム), 。これには、すべての太陽光発電設備における回路の定格、接地、遮断装置、過電流保護、および表示に関する規定が含まれています。 2023年のNEC改訂では、建物設置型システムに適用される急速遮断(第690.12条)に関する要件が追加されました。地域の解釈によっては、住居に直接隣接するパティオもこの要件の対象となるという主張も成り立ちます。.
許可申請手続きには通常、タイルの配置や配線経路を示した敷地計画図、太陽光発電アレイ、インバータ、遮断器、および接続点を示した単線電気図、構造詳細図またはメーカーによる耐荷重認定書、ならびに施工業者の電気工事士免許番号の提出が必要となります。. EcoFlowの法令遵守ガイド 管轄区域の種類ごとに、許可要件について役立つ概要をまとめています。.
この手順を省略しないでください。許可を得ずに太陽光発電システムを設置すると、住宅保険が無効になるほか、電気火災や感電事故が発生した場合に賠償責任が生じる可能性があり、さらに、買い手の検査員が規定に準拠していないシステムを指摘した場合、転売時の不動産価値が低下する恐れがあります。.
GFCI保護、逆給電用ブレーカー、および絶縁スイッチ
湿気の多い場所での地上設置型太陽光発電設備は、感電のリスクが高まります。その 2023年版NECのGFCIに関する要件 すべての屋外用コンセント、ひいては水との接触が予想されるあらゆる電気系統について、漏電遮断器(GFCI)による保護を義務付ける。 パティオに設置される歩行可能なソーラータイルの場合、これはインバータの出力回路にGFCI保護を組み込む必要があり、DC側には地絡検出・遮断(GFDI)機能を組み込む必要があることを意味します。これは、最近のほとんどのソーラーインバータに標準装備されている機能です。.
太陽光発電回路は、以下の経路を通じて建物の配電盤に接続されています。 逆給電用遮断器, 、これはNEC 120%の規定に準拠する必要があります。すなわち、メインブレーカーと太陽光発電からの逆送電用ブレーカーの合計電流は、パネルのバスバー定格の120%を超えてはなりません。 例えば、200Aのメインブレーカーを備えた200Aのパネルの場合、設置可能な太陽光発電系統連系用ブレーカーの最大定格は40Aとなります(200 × 120% = 240A;240A − 200A = 40A)。 パティオシステムがこの制限を超える場合は、パネルをアップグレードするか、ライン側のタップ接続を設置する必要があります。.
インバーターと配電盤の間には、孤立スイッチ(AC遮断器)を設置する必要があります。このスイッチは、電力会社の作業員や緊急対応要員がアクセスできる場所に設置し、NEC 690.13に従って明確に表示しなければなりません。パティオへの設置の場合、このスイッチは通常、タイル敷きの付近の外壁に取り付けられます。.
認証、保証、および施工業者の資格要件
歩行可能なソーラータイルは、少なくともIEC 61215(設計認定)、IEC 61730(安全認定)、および該当する地域認証(米国ではULリスト、EUではCEマーキング)を取得している必要があります。 建物に隣接して設置する場合、防火等級(UL 790に基づくクラスA、B、またはC)が重要となります。滑り抵抗については、独立した試験機関により、ASTM D2047、ANSI A326.3、またはDIN 51130に基づく認証を取得している必要があります。.
インストーラーは以下を保持すべきである NABCEP太陽光発電設置専門家認定 (米国の太陽光発電設置業者にとってのゴールドスタンダード)、有効な州の電気工事免許、および太陽光発電設備の設置をカバーする賠償責任保険。建設業向けOSHA 10認定は、安全面における基本要件です。作業開始前にすべての認定証の提示を求め、独自にその有効性を確認してください。その Jia Mao BIPVメーカー選定ガイド 製品認証と施工業者の資格の両方を評価するための、より包括的な枠組みを提供しています。.
排水、防水シート、およびフラッシング
水たまりを防ぐための排水計画
ソーラータイルの表面に水が溜まることは、エネルギーの面での問題(溜まった水が光を散乱させ、出力を5~15%低下させる)であると同時に、安全上の問題(滑りのリスクが高まり、バイオフィルムの成長が加速する)でもあります。パティオの表面は、水が排水されるように傾斜をつける必要があります。最低傾斜角度は 建物から1–2%離れている これはすべてのパティオ工事における標準的な手法であり、歩行可能なソーラータイルも例外ではありません。.
透水性目地設計(タイルの隙間から水が砂利層へと排水される方式)の場合、地下水を周囲のフレンチドレインや地表排水口へと導くよう、砂利層自体の勾配を適切に設定する必要があります。 不透水性の設計(構造スラブ上の防水膜の上にモルタルを敷き、その上にタイルを敷設する方式)の場合、低地部に表面排水設備を組み込む必要があり、排水格子はタイル表面と面一になるように設置し、雨水排水システムに接続しなければなりません。.
タイル施工における膜材の適合性
すべての防水シートが、タイルの台座支持部を通じて伝わる集中荷重に耐えられるわけではありません。硬質断熱材の上に敷設された標準的なTPOシートは、集中荷重によって穿孔される可能性があるため、台座の脚とシートの間に保護ボード(通常は1/4インチの高密度ポリエチレン製)を挟む必要があります。 EPDM防水シートは穿孔に対する耐性が高いですが、接着剤で施工するフラッシングの詳細部分との相性はあまり良くありません。液状塗布型防水シート(ポリウレタンまたはPMMA)は、複雑な形状に密着し、コンクリート下地に直接接着するため、貫通部が多数ある複雑な形状のパティオには、このタイプが好まれます。.
防水シートは、タイル用接着剤、目地用シーラント、および配管材料と化学的に適合していなければなりません。瀝青系(アスファルト系)の防水シートは、時間の経過とともにPVC製配管を劣化させる可能性がありますが、一部のシリコーン系シーラントはTPO表面に密着しません。システムを指定する前に、防水シートメーカーおよびタイルメーカーの両方から適合性データを入手してください。.
端部および貫通部の周囲における防水処理の詳細
特に注意が必要なフラッシングの設置箇所としては、壁とパティオの接合部(パティオが家の基礎と接する部分)、内角(パティオの2つの端が90°で交わる部分)、排水管の貫通部(排水管が防水膜を貫通する部分)、および電線管の貫通部(電線管が防水層に出入りする部分)などが挙げられます。 これらの各箇所では、プライマーの塗布、ベースフラッシング層の設置、防水シートをフラッシングに重ね合わせ、適合するシーラントで密封し、保護カバーまたはカウンターフラッシングを設置するという標準的な手順に従います。.
その SolarTech フラッシング取付ガイド 一般的な太陽電池パネルと建物の接合部におけるフラッシングの詳細図を掲載しています。特にパティオへの設置においては、壁の基部フラッシングが最も重要なポイントです。これは、仕上げ地盤面から最低4インチ上まで延ばし、レグレットにカウンターフラッシングを施すか、あるいは壁のクラッディングの耐候性バリアの裏側に差し込む必要があります。.
負荷テストと耐久性
規定の負荷制限および安全余裕
歩行可能なソーラータイルは、2つの荷重指標によって評価されます: 分散負荷 (タイル表面全体にわたる均一な圧力。単位はPSIまたはkPa)および 点荷重 (家具の脚やハイヒールなど、単一の接触点から加わる集中荷重。単位はkgまたはlbs)。オニキス・ソーラー社の「歩行可能な太陽光発電床」は、最大 400 kgの集中荷重. PLATIOの舗装タイルは、最大2トンの車両に対応しています。Jia Mao Bipvの太陽光発電用床タイルは、10,000 PSIの圧縮強度を有しており、継続的な歩行や軽作業用車両の荷重に耐えることができます。.
安全余裕は極めて重要です。点荷重400 kgと定格されたタイルは、使用中に決して正確に400 kgの荷重を受けるべきではありません。これは破損の閾値であり、使用限界ではないからです。標準的な工学慣行では、安全率として 2.0–3.0x, 、つまり、定格荷重400 kgのタイルには、通常の使用において130~200 kgを超える集中荷重がかからないようにする必要があります。重いプランター、ジャグジーの脚、グリルのキャスターなどは、荷重分散用のパッドの上に均等に配置しない限り、これらの制限値を容易に超えてしまう可能性があります。.
耐衝撃性と表面摩耗に関する懸念
歩行可能なソーラータイルの強化ガラス表面は、人の往来やパティオでの通常の活動による傷には強いですが、落下物による衝撃には弱く、鋳鉄製のグリル格子や重い陶器の鉢、あるいは子供が投げた石などが落下すると、ガラスにひびが入る可能性があります。 強化ガラスは小さな粒状に砕け散りますが(安全ですが、タイルは使用不能になります)、合わせガラスはひびが入っても破片がまとまったままです(場合によっては修理可能ですが、下層のセルにひびが入ったため発電量は低下します)。.
砂や小石、人の往来による表面の摩耗により、時間の経過とともに滑り止め効果が徐々に低下します。人の往来が多い商業施設では、Onyx Solarは5年ごとに表面の摩耗状態を点検することを推奨しています。 通行量が中程度の住宅用パティオの場合、通常は10年ごとの点検で十分ですが、表面が明らかに滑らかになったり、磨き上げられたりした場合は、滑り止め性能を再検査する必要があります。.
高所設置タイルにおける風上揚力の考慮事項
地上レベルのパティオは、タイルの下に風圧が作用する空隙がないため、風による浮き上がりのリスクはごくわずかです。しかし、高所にあるパティオ(屋上テラス、2階のバルコニー、高床式デッキなど)は、緩く敷かれたタイルを浮き上がらせるほどの風速にさらされます。その 『Journal of Wind Engineering』誌における屋根用舗装材の浮き上がりに関する研究 平屋根の隅や端に設置された舗装材は、強風時に、中央部の舗装材に比べて2~3倍高い浮き上がり圧力を受けることが実証された。.
対策としては、機械的固定(フレームから下地構造へネジを打ち込む方法)、ウィンドクリップ(隣接するタイルを接続する金属製ブラケット)、およびバラスト(下地材を厚くして重量を増やす方法)などが挙げられます。 基本風速が110 mphを超える風害地域にある高床式パティオについては、構造設計者がASCE 7-22第30章(構成要素および外装)に基づき、必要な固定力を算出し、適切な拘束システムを指定する必要があります。.
インストール手順とベストプラクティス
インストールの手順概要
徒歩で移動できるソーラータイルのパティオを完全に設置するには、以下の手順に従います。通常、その範囲は 5~10営業日 20 m²のプロジェクトの場合、現場の複雑さによって異なりますが:
| フェーズ | 活動 | 所要時間 | 主な考慮事項 |
|---|---|---|---|
| 1. 敷地整備 | 指定の深さ(8~12インチ)まで掘削し、排水のために整地し、元の土壌を締め固める | 1~2日 | 膨張性粘土の土壌調査;必要に応じてジオテキスタイルの設置 |
| 2. 路盤の施工 | 締固めた砂利を2インチずつ敷き詰め、縁取りを設置する | 1~2日 | ASTM D698に準拠した95%の締固め;レーザーレベルを用いて勾配を確認する |
| 3. 電気設備の粗工事 | コンジットを取り付け、ホームランケーブルを引き込み、ジャンクションボックスを取り付け、接続を解除する | 1日 | スケジュール40 PVCまたは硬質金属製コンジット;インバータにはGFDI保護を施す |
| 4. 防水処理(スラブ上への施工の場合) | 防水シートを施工し、貫通部を処理した後、24時間の水浸試験を行う | 1~2日 | 排水口に向かって2%以上の勾配を確保すること。覆土を行う前に確認すること。 |
| 5. タイルの貼り付け | メーカー指定のパターンに従ってタイルを設置し、タイル間の配線を接続する | 1~2日 | 接合部の幅を一定に保ち、仕様に従って接続部のトルクを締め付ける |
| 6. 接合部のシーリング | 目地には、指定されたシーラントまたはポリマー系砂を充填してください | 0.5日 | シーラントが硬化するには、温度が40°F以上である必要があります |
| 7. 電気設備の試運転 | インバータに配線し、各ストリングをテストし、接地を確認し、パネルに接続する | 0.5~1日 | 各ストリングのIV特性曲線の測定、絶縁抵抗計による絶縁試験 |
| 8. 検査と起動 | 電気検査に合格し、システムを起動し、監視設定を行う | 0.5日 | 検査官は、NEC 690への準拠状況、表示、および遮断装置へのアクセスを確認する |
工具、部品、および現場での安全対策
この設置作業には、ハードスケープ工事用工具と電気配線用機器を組み合わせて使用する必要があります。具体的には、プレートコンパクター、レーザーレベル、ダイヤモンド湿式切断機(縁取りタイルの切断用)、コンジットベンダー、ワイヤーストリッパー、トルクレンチ(MC4またはメーカー固有のコネクタ用)、マルチメーター、絶縁抵抗計(メガー)などです。 電気工事部分は、有資格の電気工事士が行う必要があります。この工程はDIYでは対応できません。.
現場での安全対策としては、系統連系作業中は建物の主配電盤の電源を遮断すること、配線が露出している間に直流電圧が発生するのを防ぐため、設置作業中はタイルの表面を不透明な素材で覆うこと、直流作業にはすべて絶縁工具を使用すること、そして施工中は警告標識を設置することが挙げられます。 ソーラータイルは光にさらされると電圧を発生します。配線が露出している未完成のパティオは感電の危険を伴うため、設置工程中は継続的に管理する必要があります。.
使用前試験および試運転手順
システムの稼働開始前に、設置業者は各ストリングについてIV曲線トレース(すべてのタイルが想定通りの電圧および電流を発生していることを確認するため)、絶縁抵抗試験(500Vまたは1,000V DCでのメガー試験により、地絡がないことを確認するため)、 接地導通試験(露出した金属フレームがすべて機器接地導体に接続されていることを確認するため)、およびすべての接続部、シーラント、フラッシングの詳細に関する目視検査を実施する必要があります。監視システムを起動し、ベースライン設定を行う必要があります。つまり、発電開始後の最初の1日分のデータを記録し、将来の性能比較のための基準として保存します。.
メンテナンス、清掃、および長期ケア
効率性と滑り止め性能を維持するための清掃手順
地上に設置されたソーラータイルは、屋上に設置されたパネルよりも早く、汚れ、花粉、落ち葉、有機物が蓄積します。『』に掲載された研究によると、 PMC/NIH 場所や清掃頻度によって、5~25%の汚れによる損失が確認されている。また、水平面(傾斜角0°)は、雨によって付着物が効果的に洗い流されないため、傾斜面よりも汚れが蓄積しやすい。.
歩行可能なソーラーパティオタイルの推奨される清掃手順は、毎週、ほこりやごみをほうきやエアブロワーで取り除き、毎月、低圧の水と柔らかいブラシを使って洗浄すること(ミネラル分の沈着を防ぐため、脱イオン水または軟水を使用すること)、有機物の汚れ(鳥の糞、樹液、 食べ物のこぼれ)は、pH中性の洗浄剤ですぐに除去してください。また、研磨パッド、1,500 PSIを超える高圧洗浄機、または滑り止めコーティングやAR処理を損傷する可能性のある化学溶剤は絶対に使用しないでください。.
Jia Mao Bipvは、自浄作用のある撥水コーティングを自社製品に組み込んでいます。 太陽光発電用床タイルの製品ラインナップ これにより、清掃頻度を最大70%まで削減できます。これは、住宅用設備において、最適な出力を維持するために通常2~4週間ごとに表面を清掃する必要がある場合と比較して、メンテナンスコストを大幅に削減できることを意味します。.
シール、接合部、およびタイルの状態の点検
シーラントおよび目地の状態は、6か月ごとに目視で点検する必要があります。春と秋は、点検を行うのに適した時期です。 タイルの目地でシーラントにひび割れ、剥離、欠損がないか、電気配線貫通部の周囲に変色や膨れ(湿気の侵入を示唆)がないか、タイルのガラス面にひび割れや欠けがないか、また、端部の固定具が緩んでいないか、周囲のタイルがずれていないかを確認してください。 ひび割れたタイルは速やかに交換してください。ガラス表面が損傷していると、水がPVセルに到達し、腐食や劣化を加速させ、電気回路を通じて隣接するセルにも影響が波及する恐れがあります。.
季節ごとのメンテナンス計画と点検チェックリスト
| シーズン | 保守作業 | 検査の重点項目 |
|---|---|---|
| 春 | 花粉の季節が終わったら徹底的に掃除し、排水口をきれいにし、冬の凍結による損傷箇所にシーラントを塗布して補修する | 継手の完全性、端部の拘束状態、排水流量試験 |
| 夏 | 定期的な清掃スケジュールを策定する;出力のピーク値を監視する;熱によるシーラントの軟化がないか確認する | 生産データと基準値の比較;表面が滑らかに見える場合は、滑り抵抗の抜き取り検査を行う |
| 秋 | 落葉期には毎日落ち葉を取り除き、冬に備えてシーラントの状態を確認し、雨樋や排水溝の詰まりを取り除いてください。 | タイルの表面状態、電気接続の締まり具合、インバータの動作状況 |
| 冬 | プラスチック製のシャベル(金属製の刃は使用不可)による除雪;PV(太陽光発電)に安全な製品のみを使用した凍結防止処理 | 目地の凍結・融解による損傷、水たまり・氷の堆積箇所、路盤の沈下 |
事例研究とROIに関する考察
裏庭のパティオの実例
PLATIO Solarが公開している設置データは、住宅用パティオのプロジェクトにおいて具体的な参考基準となります。A ドイツ・フランクフルトでの40 m²の車道設置工事 6.64 kWpの容量を納入した。フランクフルトの平均日射量(1,050 kWh/m²/年)に基づき、年間の発電量は5,800~6,600 kWhと推定される。より小規模な ドイツ、フェブルバッハにある5平方メートルのガーデンテラス 0.84 kWpを達成し、年間約740~880 kWhを発電している。これは、屋外照明や庭の灌漑用ポンプの電力供給に加え、夕方の使用に備えて蓄電池システムを充電するのに十分な量である。.
香港では、ある学術誌に掲載された「歩行可能なPV床タイル」に関する研究において、 エネルギー変換と管理 熱帯の実際の環境下で舗装の設置試験を行い、1枚のタイルにつき9個の単結晶シリコンセルを直列接続した構成において、満足のいくエネルギー変換性能が確認された。この研究により、高温多湿の気候下で歩行者が継続的に利用するために必要な、発電出力と滑り止め・耐熱性能の両方が実証された。.
費用対効果分析と投資回収期間
20 m²のパティオ用ソーラータイル設置:25年間のコストと累積節約額の比較
初期費用
ソーラータイル(20 m²)
路盤+防水処理
電気設備+インバーター
労働・許可
ITC適用前の合計
30%連邦ITCの後
25年間の累積節約額(アリゾナ州フェニックス — 平均$0.13/kWh)
年間エネルギー価値
25年間の累計
舗装工事費の削減
前提条件:設置面積20 m²、出力1.6~1.9 kWp、フェニックスにおける年間発電量1,600~1,900 kWh(5.7 kWh/m²/日)、 電力料金 $0.13/kWh(年率2.5%で上昇)、パネル劣化率 0.5%/年、連邦ITC 30%。回避された舗装材コストは、代わりに購入されていたであろう従来の舗装材のコストを表す。 純回収期間:フェニックスでは12~18年、日射量が少ない地域では18~25年。.
歩行可能なソーラータイルの回収期間は、傾斜角0°でのモジュール効率が低く、ワット当たりの設置コストが高いため、従来の屋上ソーラー(通常5~9年)よりも長くなります。 その価値提案は、kWhあたりのコスト計算では見落とされがちな3つの要素に焦点を当てています。すなわち、パティオの床面はいずれにせよ必要だったこと(ソーラータイルは従来の舗装材に取って代わるものであり、空きスペースを埋めるものではない)、屋根への貫通工事や外観上の妥協がないこと、そして設置によって不動産価値が測定可能に高まり、鑑定士もソーラー設備を備えた住宅においてその価値をますます認めるようになっていることです―― EnergySageのデータ この調査によると、太陽光発電設備の設置により、全国の住宅販売価格が平均で$15,000~$25,000上昇することが示されている。.
将来の拡張性とアップグレードの道筋
適切に設計されたソーラータイルパティオは、本質的に拡張性があります。各タイルがマイクロインバーターに接続された独立した発電ユニットとして機能するモジュール式の電気システムにより、既存の回路を再配線することなく、アレイの端にタイルを追加することで拡張が可能です。後日、住宅所有者がパティオを拡張する場合、新しいタイルは既存のモニタリングプラットフォーム上の追加されたマイクロインバーターチャンネルに接続されます。.
技術のアップグレードも可能です。10~15年後に高効率のセルが市場に出回った際、タイルガラスとフレームに新しいセルを再ラミネートすることが理論上可能となります。これにより、下地、防水層、電気設備を維持したまま、太陽光発電コンポーネントのみをアップグレードすることが可能です。 これは、モジュール全体(フレーム、ガラス、セル)を一体として交換する従来のパネルと比較して、BIPV方式が持つ重要な利点です。. Jia Mao Bipvのモジュール式電気設計 特に、システム全体の停止を必要とせずに個々のタイルの交換や技術の更新サイクルに対応できるよう設計されており、この設計上の特徴により、設置システムの経済的耐用年数は、太陽光発電システムの25年間の保証期間をはるかに超えて延長されます。.
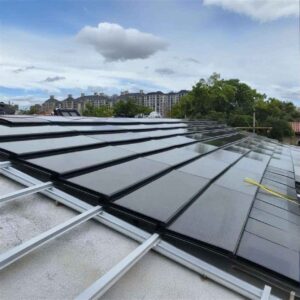
動画:PLATIOソーラー舗装の設置方法
PLATIO Solarが提供するこの段階別の設置ガイドでは、住宅の車道にソーラー舗装材を組み込む全工程――路盤の準備からタイルの敷設、配線、システムの試運転に至るまで――を解説しています:

裏庭のパティオに歩行可能なソーラータイルを組み込むことは、ハードスケープ工事、太陽光発電システムの設計、防水工事、および電気工事基準への準拠が交差する分野におけるエンジニアリングプロジェクトです。 適切な下地設計、排水計画、防水シートの詳細設計、NEC(米国電気工事規定)に準拠した配線、そして体系的なメンテナンスプログラムを備え、正しく施工されれば、25年以上も発電を続けながら、機能的で魅力的な屋外リビングスペースとしても機能する、一石二鳥の空間が実現します。.
このプロジェクトを検討している住宅所有者が次に取るべき具体的な手順は、パティオエリアの太陽光発電設置適性評価(直射日光が最低4時間当たる場所)を行い、歩行可能なソーラータイルシステムの導入実績が確認できるNABCEP認定施工業者から少なくとも3社に見積もりを依頼し、製品の認証 (IEC 61215、IEC 61730、ASTM D2047 滑り抵抗、防火等級)を確認し、管轄の地方自治体と電気工事許可の要件を確認し、システムの稼働前にメンテナンス契約または自己メンテナンス手順を確立することです。.
ソーラーパティオによる発電のメリットを享受したいが、製品の選び方についてアドバイスが必要な方へ、, ジャ・マオ・ビップフ 以下の製品を幅広く取り揃えております 歩行可能な太陽光発電用床タイル 10,000 PSIの圧縮強度、IP68準拠の防水接続部、ASTM D2047に準拠した滑り止め性能、そして25年間の性能保証を備えています。これらは、原材料から設置済みのタイルに至るまで完全なデジタルトレーサビリティを備えた3 GW規模の製造施設によって支えられています。 お客様の裏庭に「歩行可能なソーラータイル」が最適なソリューションであるかどうかを判断するには、まず現場の具体的な状況を専門家による評価を行うことが不可欠な第一歩となります。.
よくある質問(FAQ)
1. 「歩行可能なソーラータイル」とは何ですか?また、裏庭のパティオにはどのように取り入れることができますか?
「歩行可能なソーラータイル」は、構造用舗装面と発電装置の機能を兼ね備えた、建築物一体型太陽光発電(BIPV)モジュールです。 各タイルには、400~10,000+ kgの点荷重に耐える圧縮強度を持つ、強化された滑り止めガラスの層の間にラミネートされた太陽電池セルが封入されています。 これらのタイルは、下地(コンクリートスラブ上の締固められた砂利・砂、またはモルタル)に、従来の舗装材と同じ配置原則に従って設置されます。ただし、各タイルをマイクロインバーターおよび建物の配電盤に接続する電気配線が追加されます。 このタイルは従来のパティオ用舗装材を完全に置き換え、歩行面としての役割を果たすと同時に、中緯度地域において年間1平方メートルあたり80~130 kWhの電力を発電します。以下のような製品は Jia Mao Bipv社の太陽光発電フロアタイル これらは、IP68規格に準拠した防水接続部とモジュール式の電気設計を備え、この2つの用途に対応するよう特別に設計されています。.
2. 歩行可能なソーラータイルは、パティオに十分な防水性を確保できるのでしょうか?
歩行可能なソーラータイル自体は、電気部品への水の浸入を防ぐIP67またはIP68規格のジャンクションボックスを備えた防水ユニットです。ただし、タイルの表面は連続した防水膜ではないため、水はタイル間の目地から浸透し、下層の排水システムを通じて処理する必要があります。 地上のパティオ(土や砂利の上に設置されるもの)の場合、これは砂利の土台をフレンチドレインや日光排水口に向かって勾配をつけることで対処されます。 構造用デッキや居住空間の上にあるパティオの場合、タイル支持システムの下に連続した防水膜(TPO、EPDM、または液状ポリウレタン)を敷設し、排水ポイントに向かって最低2%の勾配をつける必要があります。 目地、貫通部、および周囲の縁部については、水が下地を浸食したり、建物の外皮に侵入したりするのを防ぐために、特定のフラッシングおよびシーラントの施工詳細が必要です。.
3. 私の地域で、歩行可能なソーラータイルを設置する際、どのような許可や規制が適用されますか?
米国では、建物の電気系統に接続される太陽光発電システムについては、以下の規定に基づく電気工事許可が必要となります。 NEC第690条(太陽光発電システム). 許可申請には、敷地配置図、単線電気図、構造耐荷重証明書、および設置業者の電気工事士免許が必要です。NEC 210.8(A)に基づき、湿気の多い屋外での設置にはGFCI/GFDIによる保護が義務付けられています。 太陽光発電回路は、NEC 120%の規定に従い、バックフィードブレーカーを介して接続されます。さらに、自治体によっては、ハードスケープ工事に建築許可が必要となる場合があります。一部の管轄区域では、太陽光発電専用の別途許可が求められることもあります。作業を開始する前に、必ず管轄当局(AHJ)に要件を確認してください。 許可なく設置を行った場合、住宅所有者保険が無効となり、法的責任を問われる可能性があります。.
4. 歩行可能なソーラータイルをどのように維持管理し、長期的な安全性を確保すればよいですか?
メンテナンスは、表面の清掃、目地およびシーリングの点検、電気的モニタリングという3つの並行した作業から構成されます。タイルの表面は毎週、ほうきやリーフブロワーで清掃し、毎月、軟水と非研磨性のブラシを使用して洗浄してください。目地のシーリング材およびエッジ拘束部については、6か月ごと(春と秋)に、ひび割れ、剥離、または侵食がないか点検してください。 システムの発電データを毎月監視し、ストリング平均値より90%未満の発電量しか出していないパネルがあれば調査してください。接続部の締結状態、接地導通、絶縁抵抗、およびインバーターの動作を確認する専門的な電気点検を、毎年($200~$500)実施するようにスケジュールを組んでください。 寒冷地では、プラスチック製のシャベルで除雪を行い、滑り止めコーティングを損傷させる金属製のスクレーパーや強力な化学除氷剤の使用は避けてください。セルや配線への湿気の侵入を防ぐため、ひび割れたタイルは速やかに交換してください。.
5. 歩行可能なソーラータイルのパティオからは、どれくらいの電力を発電できるのでしょうか?
発電量は、タイルの総面積、その場所の太陽放射量、および日陰の状態という3つの変数に依存します。 モジュール効率が10~15%、傾斜角が0°の場合、歩行可能なソーラータイルは、日射量が4.5~5.5 kWh/m²/日の中緯度地域において、1平方メートルあたり年間約80~130 kWhの発電量となります。 アリゾナ州フェニックスにある 20 m² のパティオでは、年間およそ 1,600~1,900 kWh を発電します。一方、シアトルにある同じパティオでは、年間 900~1,100 kWh を発電します。 PLATIO Solar が記録したフランクフルトでの設置事例(40 m²)では、6.64 kWp の容量を達成し、年間発電量は 5,800~6,600 kWh と推定されています。 これらの数値は、最適な傾斜角度で設置された屋上パネルで覆われた同面積の場合よりも35~45%低いものであり、これは水平で歩行可能な表面を使用することによるトレードオフである。.
6. 歩行可能なソーラータイルは、子供やペット、素足にとって安全ですか?
適切な認証を受けた歩行可能なソーラータイルは、子供やペットを含むすべての歩行者にとって安全です。これらのタイルは安全超低電圧(SELV)で動作し、通常、1つのタイルストリングあたり30~50V DCです。これは、人が触れると危険とされる60V DCの閾値を下回っています。 電気接続部はIP67/IP68規格(水没耐性)に準拠して密閉されており、通電中の部品への接触を防止しています。ガラス表面は、濡れた状態を含め、ASTM D2047またはDIN R11~R13の滑り抵抗基準を満たしています。 夏の直射日光下では、表面温度が50~65°C(122~149°F)に達することがあり、これはコンクリート舗装材と同程度ですが、午後の日差しが最も強い時間帯には、素足で歩くと不快に感じる可能性があります。 黒色ではなく、より明るい色のガラス(オパール色や透明色)のタイルを敷設することで、表面温度を5~10°C低下させることができます。.
7. 歩行可能なソーラータイルのパティオを設置するには、どのような地盤整備が必要ですか?
路盤は、タイルのガラス部分にひび割れが生じたり、防水シールが破損したりするような不均一沈下を防ぐよう設計されなければなりません。標準的な仕様は、締固められた原地盤の上に、締固められた砕石(ASTM D2940 粒度分布)を4~6インチ敷き、その上に1インチの整地用砂またはモルタル床を被せるものです。 締固めは、ASTM D698に準拠した最大乾燥密度95%に達するよう、プレートコンパクターを用いて、1層ごとに少なくとも2回の直交方向の締め固めを行う必要があります。膨張性粘土質土壌の場合は、より深い掘削(8~12インチ)とジオテキスタイルによる分離が必要です。 排水のため、路盤は1–2%の勾配で整地されなければならない。この下地処理は、プレミアム舗装の施工と同様であるが、砂の均し層を敷設する前の砕石路盤の段階で、電気配管を組み込むという追加要件がある。.
8. 歩行可能なソーラータイルは、従来の屋上設置型太陽光発電と比べてコスト面でどうでしょうか?
歩行可能なソーラータイルは、タイル本体だけで約$150~$250/m²であり、下地、防水、電気工事、人件費を含めた総設置費用は$400~$575/m²となります。 従来の屋上用ソーラーパネルの場合、パネル単体の価格は$100~$200/m²で、下地、防水、電気工事、人件費を含めた総設置費用は$200~$350/m²となります。 しかし、この歩行可能なタイルは、従来型の舗装材($15~$60/m²)に取って代わるものであり、舗装費用の削減分として$15~$60/m²の利益が得られる。 傾斜角0°での効率が低いため、歩行可能タイルからの均等化発電コスト($0.15–$0.25/kWh)は、屋上太陽光発電($0.05–$0.10/kWh)よりも高くなります。 屋上パネルではなく歩行可能タイルを採用する決定は、純粋に経済的な理由ではなく、建築的および空間的な要因によるものです。これは、屋上太陽光発電が実現不可能な場合、パティオエリアの建設や改修がすでに進行中の場合、あるいは美的調和が最優先要件となる場合に理にかなっています。.
9. 歩行可能なソーラータイルにひびが入ったり、割れたりした場合はどうなりますか?
強化ガラスタイルは、破損すると自動車のサイドウィンドウと同様に、比較的安全な小さな粒状に砕けます。破損したタイルは発電を停止しますが、隣接するタイルに組み込まれたバイパスダイオードが電流を故障したユニットを迂回させるため、感電の危険はありません。ほとんどのメーカーは、システム全体を停止させることなく個々のタイルを交換できるモジュール式の電気アーキテクチャを採用してシステムを設計しています。 交換作業は、破損したタイルの取り外し、その電気接続ケーブルの切断、新しいタイルの取り付け、再接続、そして接合部のシーリングという手順で行われます。資格を持つ施工業者であれば、通常1~2時間で完了します。迅速な修理を行うため、予備のタイルを2~3枚手元に用意しておくことをお勧めします(ロットの一致を確保するため、最初の注文時に購入しておく必要があります)。.
10. 歩行可能なソーラータイルは、DIYで自分で設置できますか?
ハードスケープ工事(掘削、路盤、タイル敷設)は、舗装ブロックの設置経験がある熟練のDIY愛好家であれば行うことができます。 しかし、電気工事部分(タイルへの配線、インバーターの接続、遮断スイッチの設置、および建物の配電盤への接続)については、NEC第690条および事実上すべての地域の電気工事規定に基づき、有資格の電気工事士が施工しなければなりません。 DIYによる電気工事は許可や検査を受けることができないため、法的に電力網に接続することはできず、住宅保険が無効になる可能性があり、感電や火災の責任問題を引き起こす恐れがあります。推奨される方法は、ハードスケープ工事には総合建設業者を、そして NABCEP認定の太陽光発電設置業者 電気工事については、両者が連携して、2つの作業範囲をまたぐ下地配管の配置を調整する。.


-300x300.jpg)