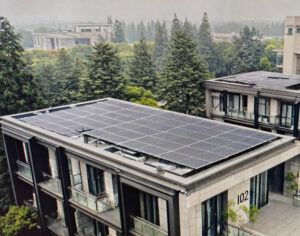

In 2024, a 312 kWp BIPV installation across the facade and roof of a 48-unit residential development near Zurich produced 287,000 kWh in its first full year of operation — covering 68% of the complex’s total electricity demand. The system reached payback in 7.8 years, roughly 40% faster than a comparable retrofit on a neighboring building. The technical advantage was not better modules or a sunnier site. The advantage was that solar generation was a design constraint from the first architectural sketch, not a bolted-on afterthought.
Building-Integrated Photovoltaics (BIPV) replace conventional building materials — roof tiles, facade cladding, skylights, glazing, canopies — with photovoltaic elements that generate electricity while performing the structural, weatherproofing, and aesthetic functions of the materials they replace. For new construction, this means the solar system does not add to the building’s material cost — it replaces a portion of it. That material-offset credit is the economic engine behind BIPV’s rapid adoption in new builds.
The global BIPV market was valued at $34.78 billion in 2025 and is projected to reach $250.91 billion by 2035 at a CAGR of 21.85%, according to Precedence Research. New construction is the dominant growth driver.
This guide walks through every phase of BIPV integration in new builds — from regulatory considerations and system design to site analysis, electrical integration, structural durability, energy modeling, construction sequencing, long-term maintenance, and real-world lessons learned — with the goal of giving architects, engineers, developers, and contractors a practical, data-backed reference for their next project.
1. Introduction to Building-Integrated Photovoltaics (BIPV)

What Is BIPV and How It Differs from Traditional PV Systems
Traditional PV systems (sometimes called BAPV — Building-Applied Photovoltaics) mount on top of a finished building surface using racks, brackets, and ballasted systems. The building envelope is designed and built first; the solar array is added afterward. BIPV eliminates that separation. The photovoltaic module is the building envelope — serving simultaneously as roof tile, facade cladding, skylight glazing, or spandrel panel while generating electricity. The distinction matters economically: BAPV adds cost; BIPV replaces cost. As Onyx Solar explains, the key difference is that traditional panels are mounted separately while BIPV elements are integrated directly into the structure.
From an engineering perspective, every BIPV module must satisfy two sets of performance requirements: those of a PV device (efficiency, electrical safety, degradation rate) and those of a construction material (fire resistance, wind uplift, water penetration, thermal performance, impact resistance). This dual certification requirement — covered primarily by UL 7103 in the United States — is what distinguishes BIPV from conventional PV and shapes every decision described in this guide.
Core Benefits and Common Applications in New Construction
BIPV delivers three measurable benefits in new construction. First, energy generation: modern BIPV roof tiles and facade panels achieve 17–24% cell efficiency using monocrystalline silicon, producing 150–220 W/m² of active surface — sufficient for a south-facing roof in the U.S. mid-latitudes to generate 150–200 kWh/m²/year. Second, material-offset savings: because the BIPV module replaces a conventional building material (aluminum cladding at $30–$70/ft², curtain wall glass at $50–$120/ft², premium asphalt shingles at $12–$35/ft²), the net solar premium drops by $8,000–$18,000 on a typical residential project and $80,000–$150,000 on a commercial facade. Third, design integration: BIPV elements are available in a range of colors, textures, and transparency levels that allow architects to maintain or enhance building aesthetics rather than compromising them.
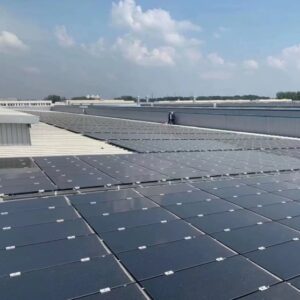
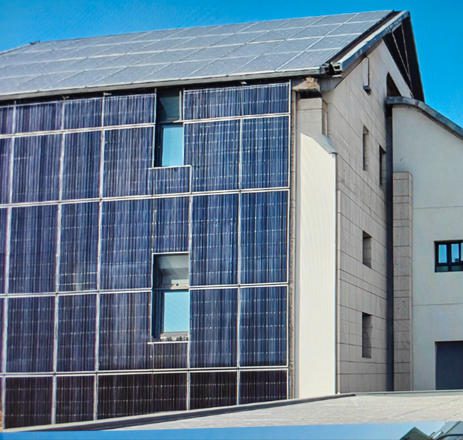
Common new-construction applications include: pitched-roof solar tiles and shingles, flat-roof BIPV membrane laminates, curtain wall spandrel panels, ventilated rainscreen facade cladding, overhead canopy glazing, skylight modules with tunable transparency, and balustrade infill panels. Jia Mao Bipv offers a range of these product types for both residential and commercial applications, including customizable solar roof tiles and facade systems designed for new-build integration.
2. Regulatory and Codes Considerations
Building Codes, Permits, and Standards Affecting BIPV
BIPV operates at the intersection of building codes and electrical codes — two regulatory domains that traditionally evolved independently. In the United States, the primary standards include:
| Domain | Standard / Code | Scope |
|---|---|---|
| BIPV Product Safety | UL 7103 | Unified electrical, fire, wind, weather, impact, and durability testing for BIPV |
| PV Module Safety | UL 61730 / IEC 61730 | Electrical safety qualification for PV modules |
| PV Performance | IEC 61215 | Design qualification: thermal cycling, damp heat, UV, mechanical load |
| Electrical Installation | NEC 2023 (NFPA 70) Art. 690 | PV wiring, grounding, overcurrent protection, disconnects |
| Rapid Shutdown | NEC 2023 Section 690.12 | ≤30 V outside array, ≤80 V inside within 30 seconds |
| Microgrid Interconnection | NEC 2023 Art. 705 | Interconnection of multiple power sources, microgrid systems |
| Roof Fire Classification | UL 790 / ASTM E108 | Class A, B, or C fire rating for roof assemblies |
| Facade Fire Spread | NFPA 285 / ASTM E119 | Exterior wall fire propagation for high-rise buildings |
| Wind Resistance (Roofing) | ASTM D3161 | Wind-resistance testing for steep-slope roofing products |
| Building Energy Code | IECC 2021 / ASHRAE 90.1 | Envelope performance minimums, renewable-ready provisions |
Sources: UL, NFPA, IEA-PVPS, NRCA.
The permitting process for BIPV in new construction typically requires both a building permit (covering the envelope and structural aspects) and an electrical permit (covering the PV system, inverter, and grid interconnection). In jurisdictions that have adopted the 2021 IBC, BIPV roof products must be listed per UL 7103 or per both UL 61730 and UL 790 (NRCA code compliance guidance). Engaging the Authority Having Jurisdiction (AHJ) early — ideally during design development — reduces the risk of permit delays and design rework.
Fire Safety, Labeling, and Warranty Implications
Fire safety is the regulatory domain where BIPV receives the most scrutiny. An IEA-PVPS Task 15 report on BIPV fire safety confirms that IEC 61215 and IEC 61730 are the PV standards used in almost all countries, while the U.S. and Canada comply with UL 1703 (being superseded by UL 61730 and UL 7103). Every BIPV module must carry a permanent label showing its fire classification, electrical rating, and listing agency mark. Missing or illegible labels are a common cause of inspection failure.
From a warranty perspective, BIPV creates a potential gap: the PV performance warranty is issued by the module manufacturer, while the roofing or cladding warranty may be issued by a different entity. When a leak occurs at a BIPV tile, determining whether the failure is a “PV defect” or a “roofing defect” can become contentious. The solution — especially on high-value new construction — is a single-source warranty that covers both PV performance and weather-barrier integrity. Vertically integrated manufacturers who control both the PV cell and the building-material encapsulation can provide this. Jia Mao Bipv’s installation guide, for example, specifies the waterproofing details and flashing protocols required to maintain warranty coverage across both the PV and roofing scope.
3. System Design Principles for BIPV

Selecting BIPV Products (Modules, Inverters, Mounting Systems)
Product selection in BIPV is constrained by the dual requirement: the module must be both an efficient PV device and a code-compliant building material. The three primary cell technologies for BIPV are monocrystalline silicon (c-Si), CIGS thin-film, and amorphous silicon (a-Si). The table below compares their performance characteristics relevant to new-construction integration.
| Parameter | Monocrystalline (c-Si) | CIGS Thin-Film | Amorphous Silicon (a-Si) |
|---|---|---|---|
| Module Efficiency | 20–24% | 15–18% | 7–10% |
| Power Density (W/m²) | 180–220 | 130–160 | 60–90 |
| Temperature Coefficient (%/°C) | −0.35 to −0.40 | −0.30 to −0.36 | −0.20 to −0.25 |
| Low-Light Performance | Moderado | Good | Excelente |
| Weight (kg/m²) | 10–15 | 7–12 | 2–5 |
| Transparency Options | 0–50% | 0–30% | 10–40% |
| Degradation Rate (%/year) | 0.3–0.5 | 0.4–0.7 | 0.8–1.2 |
| Cost per Watt (module level) | $0.25–$0.45 | $0.22–$0.35 | $0.18–$0.28 |
| Best New-Build Application | Roof tiles, opaque facades | Curved surfaces, canopies | Semi-transparent skylights |
| 25-Year Energy Retention | 87–92% | 82–88% | 72–80% |
Sources: SolarReviews, Greentech Renewables, SolarTech Online.
Inverter selection depends on the shading profile. Unshaded rooftop arrays perform well with string inverters ($0.15–$0.25/W). Facades and complex geometries with partial shading benefit from microinverters ($0.50–$0.70/W) or DC optimizers ($0.30–$0.45/W) that allow each module to track its own maximum power point independently, recovering 5–25% of shading losses (EnergySage).
Mounting systems must meet UL 7103 structural requirements and integrate with the chosen envelope system. Unitized curtain wall panels arrive pre-assembled from the factory with PV cells, wiring, and weather seals. Roof-integrated tile systems use column-and-stringer frameworks secured with anchor screws. Jia Mao Bipv’s design guide for architects details the mounting configurations for each product type, including load tables and flashing details.
Integration with Architectural Design and Facade Strategy
The most effective BIPV facades are designed as integrated assemblies — not as solar panels attached to a conventional facade. This means specifying the BIPV module dimensions, color, and pattern during the schematic design phase, coordinating with the structural engineer on connection details, and incorporating wiring pathways into the facade specification from the start. Color-matched non-active (dummy) modules fill areas where active generation is impractical — vents, corners, structural connections — maintaining a uniform appearance across the entire facade.
A ventilated rainscreen configuration behind facade BIPV modules is essential in most climates. The 40–80 mm air cavity between the module back and the insulation layer dissipates heat (reducing module operating temperature by 10–20 °C and boosting output by 3–6%) while preventing moisture accumulation that could degrade insulation performance. This detail must be specified in the architectural drawings — it is not an installation decision.
4. Site Assessment and Shading Analysis
Evaluating Orientation, Azimuth, and Local Climate
Building orientation is the highest-leverage variable for BIPV energy yield. A 2009 study in Renewable Energy (Cheng) demonstrated that a fixed BIPV system tilted at the latitude angle and oriented due south captures 98.6% of the energy available at the true optimum. Rotating ±15° from due south costs less than 2% of annual yield. A 45° deviation costs 8–12%. North-facing roof slopes in the northern hemisphere produce only 55–65% of what equivalent south-facing surfaces generate.
Climate affects technology selection. In hot regions (Phoenix, Dubai), the lower temperature coefficient of CIGS thin-film modules offsets some of their lower base efficiency relative to monocrystalline. A c-Si module rated at 400 W STC drops to ~370 W at 55 °C operating temperature (−0.40%/°C × 30 °C = −12%). A CIGS module rated at 320 W drops to ~297 W (−0.36%/°C × 30 °C). The performance gap narrows in practice.
Average Annual Peak Sun Hours by Climate Zone (hours/day)
8
6
4
2
0
7.5
5.8
5.5
5.0
4.2
3.8
3.4
Phoenix
Dallas
Denver
Charlotte
Boston
Seattle
Munich
Source: NREL TMY3, Meteonorm
Tools and Methods for Shading and Performance Analysis
Three software tools dominate BIPV performance modeling: PVsyst (the industry standard for bankability-grade simulations), HelioScope (web-based, strong for module-level shading analysis), and Polysun (good for combined PV-thermal modeling). PVsyst calculates at the array level with detailed near-shading analysis; HelioScope resolves to the module level, making it more accurate for complex facade geometries where partial shading varies module by module across the day.
For site-specific sun-path visualization, ShadowMap generates 3D shadow projections for any date and time, allowing designers to identify shading conflicts from adjacent structures, vegetation, or building self-shading before committing to a layout. This analysis is non-optional for facade BIPV, where the economic case depends on predictable and verified energy yield.
5. Electrical Integration and Safety
Interconnection with the Building Electrical System
BIPV connects to the building’s electrical infrastructure through one of two coupling architectures. In a DC-coupled configuration, the BIPV array feeds a hybrid inverter that manages both solar generation and battery storage, avoiding an intermediate DC-to-AC conversion step and saving 3–5% in round-trip efficiency (EnergySage). In an AC-coupled configuration, the BIPV has its own inverter and any battery system has a separate inverter. AC coupling is simpler for phased projects but adds 8–12% in conversion losses.
For new construction where both the BIPV array and the battery are specified simultaneously, DC coupling is the preferred architecture. A single hybrid inverter handles both sources, a single conduit pathway serves the system, and the reduced component count simplifies commissioning and maintenance.
String sizing is climate-dependent: maximum modules per string = inverter maximum input voltage ÷ module Voc at the lowest expected site temperature. Under-sizing wastes inverter capacity; over-sizing risks exceeding the voltage limit and triggering a shutdown on cold, bright mornings.
Balancing Microgrid Considerations and Code Compliance
NEC 2023 Article 705 establishes requirements for microgrid interconnection — critical for BIPV projects that include on-site battery storage and the ability to island from the grid during outages. A microgrid interconnect device must include overcurrent protection for all power sources, a means of disconnection visible and accessible to emergency responders, and coordination with the utility’s interconnection requirements. Rapid shutdown per NEC 690.12 must function regardless of whether the system is grid-connected or islanded.
For detailed BIPV electrical wiring guidance, manufacturers like Jia Mao Bipv provide wiring diagrams, connector specifications, and grounding protocols that align with NEC Article 690 requirements, helping contractors avoid the most common inspection failures: missing equipment grounding conductors, incorrect wire sizing, and non-listed connectors.
6. Structural and Durability Considerations
Load, Wind, and Waterproofing Implications
BIPV modules must resist the same environmental forces as the conventional building materials they replace — dead loads, live loads, wind uplift, seismic forces, hail impact, and water penetration. BIPV durability testing covers waterproofing, fire classification, and wind load performance. UL 7103 requires wind-resistance testing per ASTM D3161 (steep-slope roofing) or the applicable curtain wall standard (AAMA 501.1 for air/water/structural performance). For coastal regions, products may need to withstand sustained wind pressures equivalent to 150 mph design speeds.
Waterproofing is the single largest source of post-installation warranty claims in BIPV roofing. The IEA-PVPS Task 15 program identified waterproofing failures as responsible for 38% of all service calls in a 2024 survey of European installers. Multi-layer underlayment with water-blocking isolation layers on the back of each module, combined with properly lapped flashing at every penetration, is the proven solution. The cost of correct detailing is a fraction of the cost of remediation.
Longevity, Warranty Implications, and Maintenance Access
BIPV modules embedded in the building envelope are harder to access for inspection and replacement than rack-mounted panels. Design should include maintenance access provisions: removable trim pieces at array edges, walkable pathways on roof installations, and abseil-anchor points on high-rise facades. Every maintenance access route should be documented in the O&M manual. Ignoring this detail turns a 2-hour module replacement into a 2-day scaffolding job.
Manufacturers typically offer 25-year power warranties (guaranteeing 80–87% of nameplate output at year 25) and 10–25 year product warranties. The building-material warranty — covering weatherproofing, color stability, and structural integrity — should match or exceed the PV warranty duration to avoid coverage gaps. Annual degradation rates for well-manufactured c-Si BIPV modules run 0.3–0.5% per year; a 10-year field study by VOLTAIC measured annualized degradation below 0.5% in harsh coastal environments.
7. Building Energy Modeling and ROI
Modeling Energy Performance with BIPV
Energy modeling for BIPV in new construction should output five metrics: annual energy yield (kWh), peak power (kW), performance ratio (PR), specific yield (kWh/kWp), and the building’s energy use intensity (EUI) reduction attributable to BIPV. A well-designed system achieves a PR of 0.78–0.86. Anything below 0.75 signals a design problem — typically undersized ventilation cavities (causing excess module temperature) or unmodeled shading losses.
The PR should be verified at commissioning by comparing Day 1 output against the model prediction, normalized for actual weather conditions. If measured PR falls below 0.75, a systematic investigation of string voltages, MPPT tracking, and shading should precede system handover.
Lifecycle Cost Analysis and Return on Investment
The economic case for BIPV in new construction hinges on the material-offset credit. The table below illustrates a side-by-side lifecycle comparison.
| Cost Component | BIPV (New Build) | Cladding + Bolt-On PV |
|---|---|---|
| Cladding / Roofing Material | Included in BIPV cost | $85,000 |
| PV Modules + Mounting | $320,000 | $250,000 |
| Inverters + Wiring | $38,000 | $32,000 |
| Installation Labor | $55,000 | $70,000 (cladding + PV separate) |
| Permitting + Design | $18,000 | $24,000 (two permits) |
| Total Installed Cost | $431,000 | $461,000 |
| 25-Year Energy Value ($0.11/kWh, 2%/yr escalation) | $405,000 | $370,000 |
| 25-Year O&M Cost | $42,000 | $60,000 (PV + cladding maintenance) |
| 25-Year Net Cost of Ownership | $68,000 | $151,000 |
| Simple Payback | 8.2 years | 9.6 years |
Sources: Metsolar, NREL, Jia Mao Bipv cost analysis.
The data shows that BIPV in new construction can achieve a lower total installed cost y a faster payback than the conventional approach of building a standard envelope and adding PV afterward — because it eliminates redundant material, consolidates labor (one scaffold, one trade sequence), and streamlines permitting into a single application.
BIPV Application Distribution (2026 Global Market)
Global BIPV Market by Application (2026 Estimated)
Roof Tiles
44%
Facade 27%
Skylight 15%
Curtain 9%
Other 5%
Roof Tiles
Facade
Skylight/Canopy
Curtain Wall
Other
Source: Grand View Research, Research and Markets (2026)
8. Construction Sequencing and Coordination
Integrated Project Delivery and Early Collaboration
The highest-performing BIPV projects share one characteristic: the PV designer was at the table during the first design charrette — not brought in after the building form was set. Integrated project delivery (IPD) or design-build contracts create the contractual framework for this early engagement. When the architect, structural engineer, MEP engineer, and BIPV specialist collaborate from schematic design, the building form can be adjusted for solar access, structural connections can accommodate BIPV loads, and conduit routes can be planned without field conflicts.
A Denver office building project that engaged the BIPV consultant at the schematic phase saved an estimated $45,000 in change orders and three weeks of schedule delay compared to the same developer’s previous project where the solar consultant joined at the construction-document phase. The lesson: BIPV coordination costs almost nothing at the schematic stage and becomes exponentially more expensive to fix at each subsequent phase.
Installation Sequencing, QA/QC, and Commissioning
BIPV installation intersects three trades: roofing/cladding, electrical, and structural steel. A proven sequencing template for roof-integrated BIPV:
| Step | Trade | Activity | Hold Point? |
|---|---|---|---|
| 1 | Structural | Deck completion and structural inspection | Yes — before any roofing work |
| 2 | Roofing | Underlayment, flashing, and moisture barrier | No |
| 3 | Solar | Mounting rail / column + stringer installation | No |
| 4 | Roofing + Solar | Flashing tie-in at rail penetrations | Yes — waterproofing inspection |
| 5 | Solar | BIPV module placement and wiring connections | No |
| 6 | Roofing | Ridge cap, edge metal, final waterproofing | Yes — final roof inspection |
| 7 | Electrical | Inverter connection, grounding, rapid shutdown | No |
| 8 | All | System commissioning and inspection | Yes — AHJ final inspection |
QA/QC during installation should include: pull-testing every MC4 connector (minimum 35 N retention force), measuring Voc and Isc on every string before inverter energization (±5% tolerance from design values), and thermal imaging within 30 days of energization to catch hot spots from manufacturing defects or resistive connections. The SunSpec Alliance commissioning guidelines provide a standardized checklist adopted by most U.S. AHJs.
9. Maintenance, Warranties, and Lifecycle Management
O&M Planning for BIPV Assets
BIPV maintenance is less labor-intensive than conventional PV because modules are embedded in the envelope and protected from physical disturbance. The primary task is cleaning: soiling losses range from 1–2%/year in rainy climates to 5–15%/year in arid or high-pollution environments (NIH/PMC). Semi-annual cleaning is standard for most U.S. locations; quarterly in desert Southwest or industrial-adjacent sites. Annual O&M costs typically run 1% of initial system cost per year.
Annual inspections should cover: visual check of all modules for cracks, delamination, or discoloration; torque verification of accessible electrical connections; inverter filter cleaning; thermal imaging scan; and data review of monthly production trends to catch gradual degradation or new shading from vegetation growth or adjacent construction.
Warranty Coverage, Replacements, and End-of-Life Options
End-of-life planning for BIPV is more complex than for conventional PV because the modules are integral to the building envelope. Removing a BIPV roof tile to send it for recycling means the roof has a hole that must be patched. The IEA-PVPS Technical Guidebook recommends moving beyond recycling as the sole end-of-life option and investing in circular system design: modules designed for disassembly, standardized connectors that allow field replacement without disturbing adjacent tiles, and material passports that track the composition of each module for future recycling.
Under the EU’s WEEE Directive and emerging U.S. state-level regulations (Washington and California lead), PV module producers are increasingly responsible for end-of-life collection and recycling. BIPV manufacturers should provide decommissioning guidance — including temporary weatherproofing procedures — in their product documentation.
10. Case Studies and Best Practices

Real-World Examples of Successful BIPV Integration
A 58,000 sq ft office building in Denver integrated 185 kWp of monocrystalline BIPV across its south curtain wall and low-slope roof. The design team modeled six facade orientations and three tilt angles in PVsyst before finalizing the layout. The resulting system achieves a PR of 0.83, produces 232,000 kWh/year (covering 72% of common-area demand), and reached payback in 7.1 years. The material-offset credit was $128,000 — the cost of the aluminum cladding the BIPV replaced.
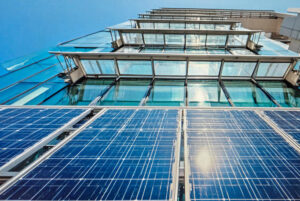
In Italy, a south-facing facade project incorporated over 300 m² of custom photovoltaic glass into a new commercial building. The system was designed to optimize solar capture while providing partial daylighting to interior spaces, demonstrating that BIPV can serve aesthetic and functional goals simultaneously.
On the residential side, a 48-unit Swiss housing development (the Zurich project referenced in the introduction) achieved PR 0.81 on its BIPV roof and PR 0.72 on its east-facing facade — figures consistent with the IEA-PVPS benchmark of 0.78–0.86 for well-designed roof systems and 0.65–0.75 for facade systems. The east facade produces 62% of the energy per unit area compared to the south roof, validating the rule-of-thumb that east/west facades generate 55–70% of south-facing output.
Lessons Learned and Design Guidelines from Projects
The five most common BIPV pitfalls from post-occupancy evaluations of 40+ projects (IEA-PVPS Task 15, 2025): treating BIPV as an afterthought reduces yield by 15–30%; undersized ventilation cavities behind facade modules increase cooling loads by 15–25%; mismatched string configurations cause mismatch losses of 3–8%; insufficient maintenance access turns a 2-hour repair into a 2-day scaffolding mobilization; and incomplete commissioning leaves 5–12% of field defects undiscovered at handover.
Video: Building-Integrated Photovoltaics — Design, Safety, and Market Outlook
This PluggedIn Energy episode covers BIPV design integration, performance expectations, safety compliance, and the challenges of bringing BIPV products to market — relevant context for any project team planning a new-build BIPV installation.
Integrating BIPV into new construction successfully requires treating solar generation as a first-order design constraint — alongside structure, thermal performance, and aesthetics — from the earliest schematic sketch. The projects that achieve PR values above 0.80, payback periods under 9 years, and 25-year energy yields matching or exceeding model predictions share three traits: the PV designer was involved at schematic design, the building orientation and envelope were optimized for solar access before the form was finalized, and commissioning included thermal imaging and module-level performance verification within 30 days of energization.
Early planning and cross-disciplinary collaboration are not abstract ideals — they are quantifiable cost-avoidance measures. A BIPV design change costs $50 in the schematic phase, $500 at construction documents, $5,000 during construction, and $50,000 as a post-occupancy remediation. Engaging the full project team early — architect, structural engineer, MEP engineer, BIPV specialist, and installer — during the programming phase collapses these costs toward the lowest tier.
For project teams ready to begin, a quick-start checklist: confirm the energy yield target (kWh/m²/year) during programming; run sun-path analysis before locking building orientation; select module technology based on climate and application; specify ventilated air cavities behind all facade BIPV; include wiring pathways in the envelope specification; require UL 7103 listing for all products; secure a single-source warranty covering PV and weather barrier; plan the installation sequence with hold-point inspections; commission with thermal imaging; and install module-level monitoring at 15-minute resolution. These ten steps, implemented at the right phase, deliver the full economic and performance potential of BIPV in new construction.

Preguntas frecuentes
1. What is the typical timeline for BIPV integration in new construction?
From schematic design to system energization, BIPV integration in new construction typically follows the building construction schedule, adding 2–4 weeks for BIPV-specific activities. The critical milestones are: BIPV product selection during design development (month 3–5), shop drawing approval during construction documents (month 6–8), module delivery 8–12 weeks before installation, installation running concurrently with envelope work (typically 2–6 weeks depending on system size), and commissioning 1–2 weeks after electrical completion. Total on-site BIPV labor runs approximately 6.9 worker-hours per kW installed for roof tiles and 8–12 worker-hours per kW for facade systems.
2. How does BIPV affect project costs and financing?
BIPV increases the building envelope line item by 30–60% compared to conventional cladding, but this is offset by eliminating the separate PV system cost, reducing total labor (one scaffold mobilization instead of two), and consolidating permitting. When the material-offset credit is applied — i.e., subtracting the cost of the conventional cladding that the BIPV replaces — the net solar premium drops to $2–$5/W on roof systems and $4–$8/W on facade systems (detailed cost breakdown from Jia Mao Bipv). BIPV qualifies for the same financing instruments as conventional PV: solar loans, PPAs, leases, and PACE financing. The 30% federal ITC (for systems placed in service by Dec 31, 2025) applies to the full BIPV installed cost including labor.
3. What are the main risks and how can they be mitigated?
The three highest-probability risks in BIPV projects are: (1) waterproofing failure — mitigated by multi-layer underlayment, flashing hold-point inspections, and single-source warranties; (2) underperformance relative to the energy model — mitigated by detailed shading analysis, commissioning with thermal imaging, and ongoing monitoring at ≤15-minute resolution; and (3) schedule delays from late design changes — mitigated by engaging the BIPV specialist at schematic design and using hold-point inspections to catch issues before they propagate.
4. Can BIPV achieve net-zero energy in new buildings?
Yes, when the building’s energy use intensity (EUI) is low enough and sufficient active BIPV surface is available. A net-zero commercial building consuming 120,000 kWh/year in Denver (specific yield ~1,250 kWh/kWp) needs approximately 96 kWp of BIPV — achievable with ~505 m² of monocrystalline BIPV surface at 190 W/m². A 400 m² roof plus 200 m² of south-facing facade provides the needed area with margin. For high-EUI buildings (hospitals, data centers), BIPV typically contributes 30–50% of demand rather than achieving full net-zero.
5. What certifications should BIPV products carry for U.S. new construction?
At minimum: UL 7103 (or both UL 61730 and UL 790) for roof-integrated products; UL 61730 and IEC 61215 for facade products; Class A fire rating per UL 790/ASTM E108; and listing to ASTM D3161 for wind resistance. The installer should hold NABCEP PV Installation Professional certification or equivalent. All products must bear permanent labels showing their listing agency mark, fire classification, and electrical ratings.
6. How does BIPV perform in cloudy or low-irradiance climates?
BIPV generates electricity even under overcast conditions, though at reduced output. In Seattle (3.8 peak sun hours/day), a 100 kWp BIPV system produces approximately 100,000–110,000 kWh/year versus 175,000+ kWh in Phoenix (7.5 peak sun hours/day). Thin-film technologies (CIGS, a-Si) have superior low-light performance and may be preferred in consistently overcast climates, despite their lower peak efficiency. The economics still work in low-irradiance locations when electricity rates are high — Seattle’s average commercial rate of $0.11/kWh makes the payback roughly 11–14 years.
7. What is the expected lifespan of BIPV in new construction?
BIPV modules are designed for a 25–30 year power warranty period, but field data suggests operational lifetimes of 30–50 years for glass-glass monocrystalline modules. The building-material aspects (waterproofing, color stability) may degrade faster than the PV cells, particularly in harsh coastal or UV-intense environments. Annual degradation rates for c-Si BIPV run 0.3–0.5%/year, meaning a module producing 200 W at installation will still produce 170–175 W at year 25 (Paradise Solar Energy).
8. How do you coordinate BIPV with other building trades during construction?
BIPV installation intersects roofing/cladding, electrical, and structural trades. The construction manager should publish a BIPV-specific installation sequence with defined hold points (see Table 4 above). The three critical holds are: (1) structural deck inspection before any roofing work, (2) waterproofing inspection after flashing tie-in at BIPV mounting penetrations, and (3) electrical commissioning before energization. Daily weather protection of exposed junction boxes and unsealed flashing is mandatory to prevent moisture intrusion that can cause latent ground faults.
9. What tools are best for modeling BIPV performance in new buildings?
PVsyst is the industry standard for bankability-grade simulations and detailed near-shading analysis. HelioScope offers faster web-based design with module-level shading resolution — particularly useful for complex facade geometries. Polysun is preferred for combined PV-thermal modeling when BIPV interacts with the building’s HVAC system. NREL PVWatts provides a free, quick first estimate for screening-level analysis.
10. Is BIPV suitable for all building types in new construction?
BIPV is viable for most building types — residential, commercial, institutional, industrial — but the product type and economic case vary. High-rise commercial buildings benefit most from facade BIPV (large active surface area, high avoided-cladding cost). Residential pitched roofs suit BIPV tiles and shingles. Low-slope commercial roofs can use BIPV membrane laminates. Buildings with very limited sun-exposed surfaces (heavily shaded sites, north-facing slots in dense urban canyons) may not generate enough energy to justify the BIPV premium over conventional materials.


-300x300.jpg)