
Which solar panel installation method is best? The honest answer: it depends on your roof condition, available land, energy consumption pattern, budget, and local regulations. A south-facing asphalt-shingle roof in suburban Phoenix calls for a different mounting approach than a flat commercial warehouse in Seattle or a rural homestead in Vermont with acres of open pasture.
That variability is exactly why the installation method matters as much as the panels themselves. A homeowner who installs a 6 kW system on a sub-optimal north-facing roof slope will generate 20–30% less electricity annually than the same panels positioned at the correct tilt angle on a ground-mount frame — a performance gap that compounds into thousands of dollars over a 25-year system life. A business owner who selects a grid-tied system without battery backup in an area with frequent outages loses revenue every time the power goes down, while a property owner who over-invests in off-grid battery storage where grid power is reliable and cheap may never recoup the extra capital.
This guide walks through every major installation method — roof-mounted vs. ground-mounted, rail vs. rail-less hardware, grid-tied vs. off-grid vs. hybrid configurations — with real cost data, practical trade-offs, and installation diagrams. The goal is not to tell you which method is “best” in the abstract, but to give you the information to identify which method is best for your specific property, energy needs, and financial priorities.
Why Installation Method Matters
Cost and Efficiency Impact
The installation method directly affects three financial variables: upfront cost, ongoing energy yield, and long-term maintenance expense. In 2026, the average residential solar installation in the United States costs between $2.50 and $3.50 per watt, according to SolarReviews — but that range expands dramatically once you factor in mounting type. A standard roof-mounted system on an existing pitched roof sits at the lower end of that range because it uses the roof as its structural foundation, avoiding additional civil works. A ground-mounted system of the same capacity costs 20–30% more, typically $3.11 to $3.36 per watt, because it requires foundation work — either driven piles, helical screws, or concrete footings — plus dedicated conduit runs back to the main electrical panel.
The efficiency gap can offset some of that cost difference. Ground-mounted systems can be oriented at the exact optimal tilt and azimuth for your latitude, and they benefit from unrestricted airflow beneath the panels that keeps cell temperatures lower — a factor that improves energy output by 3–5% in hot climates. Roof-mounted systems are constrained by the existing roof pitch and orientation, which may deviate significantly from the ideal. A roof facing southeast at 30° pitch in a latitude-35° location will produce approximately 95% of optimal output; the same roof facing west at 15° pitch drops to 75–80%.
Property Suitability
Not every property can support every installation method. Roof-mounted systems require structural adequacy — the existing roof framing must handle the additional 2.5–4 lb/sq ft load of panels, racking, and snow (where applicable). Roofs older than 15 years may need replacement before panel installation, adding $8,000–$15,000 to the project cost. Ground-mounted systems require available land — typically 100–200 sq ft per kW of installed capacity — plus setback compliance with local zoning codes.
For buildings where neither traditional approach is ideal — historic structures with roof restrictions, urban high-rises with limited rooftop area, or new-construction projects where aesthetics matter — building-integrated photovoltaics (BIPV) offers a third path. BIPV replaces conventional building materials with photovoltaic components, eliminating the separate mounting system entirely. Manufacturers like Jia Mao Bipv produce solar roof tiles, transparent façade glass, and photovoltaic canopy systems that serve as both the building envelope and the energy system — a dual-function approach that is gaining traction in both residential and commercial construction.
Roof-Mounted vs. Ground-Mounted

Roof-Mounted Pros and Cons
Roof-mounted systems account for the vast majority of residential installations and a significant share of commercial ones. Their primary advantage is economic: by mounting panels on an existing structure, you avoid land acquisition, grading, foundation construction, and extended conduit runs. For a typical 8 kW residential system, that difference saves $4,000–$8,000 compared to a ground mount of equivalent capacity.
Roof mounts also preserve yard space entirely — a meaningful consideration for suburban properties where the backyard serves recreation, gardening, or future expansion purposes. From a permitting perspective, rooftop solar installations are typically covered under streamlined solar permits in most U.S. jurisdictions, whereas ground mounts may require separate land-use permits, setback variances, or HOA approvals.
The trade-offs are real, however. Roof access complicates maintenance: cleaning, inspection, and eventual panel replacement require ladder work or roof-access equipment, increasing service costs by 20–40% compared to ground-level work. The roof itself constrains system design — you cannot change the pitch, orientation, or shade profile without structural modification. And on roofs with multiple penetrations (vents, chimneys, skylights), the available unshaded area may be too fragmented to support an optimally configured array.
Ground-Mounted Pros and Cons
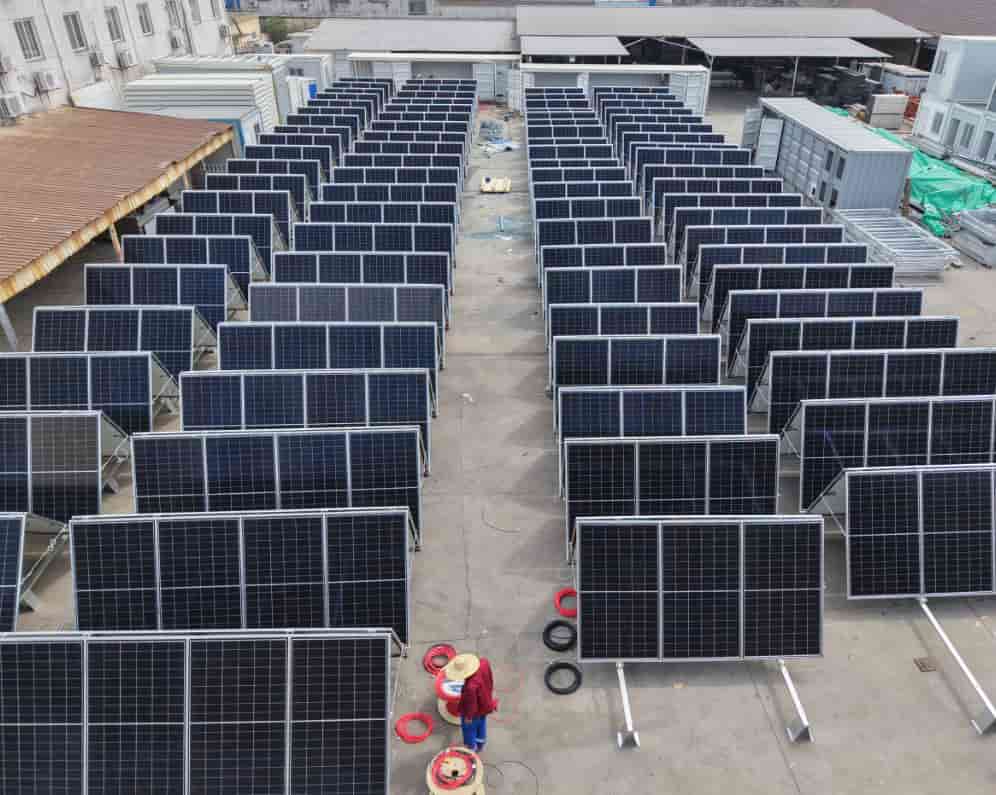
Ground-mounted systems eliminate the constraints of roof geometry. Panels can be oriented at the precise azimuth and tilt angle that maximizes annual energy production for your latitude. Tracking systems — single-axis or dual-axis — can increase annual yield by 15–25% compared to fixed-tilt installations, though they add $0.30–$0.80 per watt in hardware and maintenance costs. Ground-level access makes cleaning, snow removal, and module replacement straightforward, reducing lifetime maintenance costs.
The disadvantages center on cost and land use. The structural foundation (driven piles or concrete footings), dedicated trenching for electrical conduit, and additional wiring add 20–30% to installation cost. The system consumes usable land — a 10 kW fixed-tilt array requires approximately 1,000–1,500 sq ft of ground area. And in residential settings, ground mounts may face aesthetic objections from neighbors or zoning restrictions on freestanding structures in front yards or side yards.
Roof-Mounted vs. Ground-Mounted: Side-by-Side Comparison
| Factor | Roof-Mounted | Ground-Mounted |
|---|---|---|
| Cost per Watt (2026 avg.) | $2.50–$3.50 | $3.11–$3.60+ |
| Land / Space Required | None (uses existing roof) | 100–200 sq ft per kW |
| Orientation Flexibility | Constrained by roof geometry | Full control (azimuth + tilt) |
| Tracking Capability | Not practical | Available (single/dual axis) |
| Annual Energy Yield | 75–100% of optimal | 95–125% of fixed-tilt optimal |
| Maintenance Access | Requires roof access (ladder/safety gear) | Ground-level access |
| Permitting Complexity | Streamlined (most jurisdictions) | May require land-use / zoning permits |
| Roof Impact | Penetrations required (risk of leaks) | None |
| Aesthetics | Visible on roof; low-profile options exist | Visible at ground level; screened options exist |
| Best For | Suburban homes, commercial rooftops | Rural properties, farms, sites with poor roof conditions |
Cost data: SolarReviews, EnergySage, Paradise Solar Energy (2026 estimates). Yield data assumes Northern Hemisphere, latitude 30°–45°.
Rail vs. Rail-Less Mounting
Rail Mounting Features
Rail-based mounting is the traditional method for rooftop solar. Long aluminum rails (typically 10–20 ft each) are attached to the roof structure via lag bolts and flashing assemblies at regular intervals (every 4–5 ft). The solar panels then clamp to the rails using mid-clamps and end-clamps. This approach has been the industry standard for over 20 years and is supported by extensive engineering data, load-test certifications, and installer familiarity.
The structural advantage of rail systems is continuous load distribution. The rails spread the weight and wind-uplift forces of the panels across multiple attachment points and the full length of the rail, reducing stress concentrations on individual roof penetrations. This makes rail mounting the preferred choice for high-wind zones (120+ mph design wind speed), heavy snow-load regions, and large commercial arrays where structural margins are tight. Rail systems also accommodate virtually any panel spacing, orientation angle, and row configuration, giving designers maximum flexibility.
The drawbacks are material cost, weight, and installation time. A typical residential rail system adds $0.10–$0.20 per watt in aluminum racking hardware compared to rail-less alternatives. The rails themselves weigh 0.8–1.5 lb per linear foot, adding to the total roof load. And installation labor is higher: mounting rails requires precise alignment, multiple roof penetrations, and shimming to create a level plane on an imperfect roof surface.
Rail-Less Mounting Features
Rail-less mounting systems eliminate the continuous rails entirely. Instead, individual mounting brackets (sometimes called “flashfoot” or “L-foot” assemblies) attach directly to the roof structure at each panel connection point. The panels span between these discrete attachment points, using the panel frame itself as the structural member.
The advantages are speed and cost. Rail-less systems use 30–50% fewer hardware components, weigh less per panel, and install 20–40% faster — a meaningful labor saving when installer time runs $50–$100 per hour. The lower profile creates a sleeker appearance with less visible hardware. And fewer roof penetrations (in some designs) reduce the statistical probability of leak points.
The limitations are structural. Rail-less systems concentrate loads at discrete points rather than distributing them across a continuous rail, which can exceed allowable roof-attachment loads in high-wind or heavy-snow regions. Panel-to-panel electrical grounding — which is handled automatically by the continuous metal rail in railed systems — requires separate grounding jumpers or clips in rail-less designs. And rail-less systems offer less flexibility for non-standard panel configurations: tilt adjustments, portrait-to-landscape switching, and custom row spacing are more constrained.
Average Installation Time by Mounting Method (8 kW Residential System)
*BIPV installation time is integrated into the roofing/cladding schedule, so net additional time over conventional materials is often lower. Estimates are for panel/mounting work only, excluding electrical. Sources: installer surveys, Solar Liberty, SFS Group.
Grid-Tied, Off-Grid, and Hybrid Systems

Grid-Tied Overview
A grid-tied (or “grid-connected”) solar system feeds electricity into the utility grid when production exceeds on-site consumption and draws from the grid when it falls short — typically at night or during cloudy periods. There is no battery storage. The grid itself acts as a virtual battery, absorbing surplus generation through net metering (where available) and supplying power on demand.
Grid-tied systems are the most common and least expensive configuration. Without batteries, the system cost is 30–40% lower than hybrid or off-grid alternatives of equivalent panel capacity, according to SolarTech Online. The payback period is shorter, the maintenance burden is lower (no battery monitoring, replacement, or thermal management), and the system efficiency is higher because there are no charge-discharge losses.
The critical limitation: grid-tied systems shut down during utility outages. By code (IEEE 1547 / UL 1741), the inverter must disconnect from the grid to prevent backfeeding electricity into lines that utility workers may be repairing. This means a grid-tied system provides zero backup power during blackouts — an unacceptable trade-off for homeowners in outage-prone areas or businesses where downtime has a direct revenue cost.
Off-Grid Overview
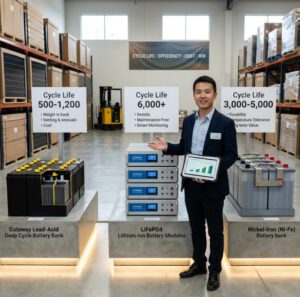
An off-grid system operates entirely independently of the utility grid. All electricity consumed on-site must be generated by the solar array and stored in batteries for use during non-sunlight hours. The system typically includes a charge controller, battery bank (lithium-ion or lead-acid), and an inverter/charger. Many off-grid systems also include a backup generator for extended cloudy periods or peak-demand events that exceed battery capacity.
Off-grid systems are the most expensive configuration, typically costing 2–3× more than a grid-tied system of equivalent panel capacity due to the battery bank (which can represent 40–60% of total system cost), the oversized panel array needed to fully charge batteries daily, and the charge controller and generator infrastructure. Annual maintenance costs are also higher: lithium-ion batteries require monitoring and eventual replacement (typical life: 10–15 years), and the backup generator needs fuel and servicing.
Off-grid is the right choice when there is no grid connection available — remote cabins, agricultural operations, mining sites, or developing-world installations where grid extension costs $15,000–$50,000+ per mile. For properties that already have grid access, off-grid rarely makes financial sense unless energy independence is valued above economic optimization.
Hybrid Overview
Hybrid systems combine grid connection with battery storage, offering the economic benefits of net metering alongside the resilience of backup power. During normal operation, the system behaves like a grid-tied installation — exporting surplus power and importing as needed. During a grid outage, the system islands itself and powers critical loads from stored battery energy and continued solar generation.
Hybrid systems cost 30–50% more than grid-tied configurations, primarily due to the battery and the hybrid inverter (which must manage bidirectional power flow between solar, battery, grid, and loads). For a typical 8 kW residential system with a 10 kWh battery, the battery and hybrid inverter add approximately $8,000–$15,000 to the project cost. Manufacturers like Jia Mao Bipv offer three-phase high-voltage hybrid inverters designed for seamless integration between solar generation, battery storage, and grid interchange — a critical component choice that affects both system performance and installation complexity.
System Type Cost Comparison — 8 kW Residential (2026 Estimates)
| Parameter | Grid-Tied | Hybrid | Off-Grid |
|---|---|---|---|
| Typical System Cost | $20,000–$28,000 | $28,000–$40,000 | $45,000–$70,000+ |
| Battery Required? | No | Yes (5–20 kWh typical) | Yes (20–60+ kWh typical) |
| Backup During Outage | None | Yes (critical loads) | Yes (full system) |
| Net Metering Eligible | Yes | Yes | No (not grid-connected) |
| Payback Period | 6–10 years | 9–14 years | 15–25+ years |
| Maintenance Cost (annual) | $150–$300 | $300–$600 | $500–$1,200+ |
| System Efficiency | Highest (no battery losses) | Moderate (5–10% battery loss) | Lowest (battery + generator losses) |
| Complexity | Low | Medium | High |
| Best For | Grid-connected homes/businesses with reliable power | Outage-prone areas, time-of-use rate optimization | Remote locations without grid access |
Cost estimates include panels, inverter, racking, battery (where applicable), labor, and permits. Sources: EnergySage, SolarReviews, ConsumerAffairs, CNET (2025–2026 data). Excludes tax credits.
U.S. Residential Solar System Type Distribution — 2025
System
Types
Hybrid (~35%)
Off-Grid (~7%)
Approximate U.S. residential solar system type distribution, 2025. Hybrid share has grown rapidly due to battery cost declines and increased outage awareness. Sources: SEIA, EnergySage marketplace data.
Watch: Roof vs Ground Solar — Which Should You Choose?
Solar Panel Installation Diagram Overview
Key Components in Installation Diagrams
Regardless of the mounting method or system type, every solar installation includes the same core electrical components, arranged in a specific sequence from generation to consumption. Understanding this sequence is essential for evaluating installation proposals and verifying that your system meets code requirements.
The component chain is as follows: solar panels generate DC electricity, which flows through DC wiring to a DC disconnect switch (required by the National Electrical Code for safe maintenance isolation). From there, the DC power enters the inverter — either a central string inverter, microinverters mounted behind each panel, or a hybrid inverter with integrated battery management. The inverter converts DC to AC electricity. The AC output passes through an AC disconnect switch, then to the building’s main electrical panel (breaker box), and finally to the utility meter (for grid-tied and hybrid systems) or directly to loads (for off-grid systems).
For hybrid and off-grid systems, a battery bank connects to the inverter/charger via a battery disconnect switch and DC wiring. The hybrid inverter manages the charging and discharging cycles, prioritizing solar self-consumption, then battery charging, then grid export (in hybrid mode). Jia Mao Bipv’s smart energy management platform adds cloud-based monitoring and control to this architecture, allowing system owners to track real-time generation, storage levels, and grid exchange from a mobile device.
Simplified System Component Flow
Diagram Differences by Method
The wiring diagram for a roof-mounted grid-tied system is the simplest: panels connect in series strings to a string inverter (or each panel connects to its own microinverter), with AC output fed to the main panel and meter. Ground-mounted systems add a longer DC conduit run from the array to the building, often requiring a combiner box at the array to consolidate multiple strings before the home run to the inverter.
Hybrid diagrams add a battery circuit: the hybrid inverter sits at the center, managing three bidirectional power flows — solar input, battery charge/discharge, and grid import/export. Off-grid diagrams replace the grid connection with a generator input and add a charge controller between the panels and batteries (in systems using a separate charge controller rather than an integrated inverter/charger). For BIPV installations, the diagram is similar to a rooftop grid-tied or hybrid system, but the panel wiring is integrated into the building’s curtain-wall or roofing system during construction, which requires coordination between the electrical contractor and the building-envelope installer.
Choosing the Right Method

Assessing Your Needs
Start with three questions: How much electricity do you consume annually? What is your primary motivation — cost savings, energy independence, sustainability, or property value? And what are the physical characteristics of your property (roof age, orientation, available land, shade profile)?
A household consuming 10,000 kWh annually with a south-facing roof in good condition and reliable grid access will typically achieve the best financial return with a grid-tied, roof-mounted, rail-based system — the most proven, lowest-cost configuration. A rural property owner with no grid access and 12,000 kWh annual consumption needs an off-grid, ground-mounted system with substantial battery storage. A business building a new headquarters and targeting LEED Platinum certification might find that BIPV façade and roof solutions deliver the combined energy, aesthetic, and certification value that conventional rack-mounted panels cannot.
Budget and Maintenance
Match the system type to your capital budget and maintenance tolerance. Grid-tied roof mount is the lowest capital option ($20,000–$28,000 for 8 kW) with the lowest maintenance ($150–$300/year). Hybrid systems add $8,000–$15,000 for battery storage but provide outage protection. Off-grid systems require the largest upfront investment and the highest ongoing maintenance budget. BIPV installations carry a premium when compared to standard panels alone, but when measured against the combined cost of conventional roofing/cladding plus separate solar panels, the total project cost is often comparable — and in some new-construction scenarios, BIPV reduces overall project timeline and labor costs.
Consider the mounting hardware as part of the lifecycle cost, not just the panels. A cheap mounting system that corrodes in 10 years will force a costly re-racking that erases years of energy savings. Industry-standard aluminum and stainless-steel racking systems with 25-year warranties — such as those offered by Jia Mao Bipv’s product line — add marginal upfront cost but eliminate mid-life structural risk.
Regulations and Incentives
The regulatory and incentive landscape has shifted substantially in the U.S. as of 2026. The 30% federal residential solar Investment Tax Credit (ITC) expired for homeowners on December 31, 2025, following the passage of the One Big Beautiful Bill Act. Commercial solar projects that commenced construction by July 4, 2026 can still claim the 30% ITC under Section 48E. State and local incentives vary widely: Solar.com’s state-by-state rebate guide provides current program details.
Net metering policies also vary by state and utility. In states with full retail-rate net metering, grid-tied systems offer the best financial returns because every kWh exported to the grid offsets a kWh at the full retail price. In states that have moved to net billing or successor tariffs (like California’s NEM 3.0), the export value is significantly lower, making battery storage — and therefore hybrid systems — more financially attractive. Before selecting a system type, confirm your utility’s current net metering policy and any planned changes over the next 2–3 years.
Permitting requirements affect installation method choice as well. Most jurisdictions offer expedited permitting for rooftop solar under a standard plan set, while ground-mount systems may trigger additional reviews for setbacks, height limits, and electrical separation requirements. BIPV installations that replace conventional building materials often qualify under standard building permits rather than separate solar permits, simplifying the approval process for new construction and major renovations.
Method Selection Decision Matrix
Score out of 10 (higher = better fit for that criterion):
9
5
2
6
9
7
2
7
10
7
8
4
Illustrative scoring based on typical residential scenarios. Actual scores vary by property, climate, and local grid conditions.
There is no universally “best” solar panel installation method — only the method that is best matched to your specific property, energy needs, budget, and priorities. A suburban homeowner with a well-oriented roof and reliable grid access will maximize financial returns with a grid-tied, rail-based rooftop system. A rural property owner with ample land and poor grid reliability will achieve better performance and energy security with a ground-mounted hybrid or off-grid configuration. A developer building a new commercial property will increasingly find that BIPV solutions from manufacturers like Jia Mao Bipv deliver combined structural, energy, and aesthetic value that conventional rack-mounted panels cannot replicate.
The practical next steps are straightforward. First, get a professional site assessment that evaluates your roof condition (or available land), shade profile, electrical panel capacity, and utility interconnection requirements. Second, request proposals that clearly itemize the mounting method, inverter type, battery option (if applicable), and warranty terms — not just a headline price per watt. Third, verify that your installer holds the appropriate licenses, carries adequate insurance, and has a documented track record with the specific mounting method you are considering. And finally, model the financial returns using your actual electricity rate, your utility’s current net metering policy, and available incentives — including any commercial ITC eligibility that may still apply to your project timeline.
The installation method you choose today will determine the performance, aesthetics, and financial return of your solar investment for the next 25–30 years. Take the time to get it right.

Frequently Asked Questions (FAQ)
1. Which is cheaper: roof-mounted or ground-mounted solar panels?
Roof-mounted systems are typically 20–30% less expensive than ground-mounted systems of equivalent capacity. The average roof-mounted residential system costs $2.50–$3.50 per watt in 2026, while ground-mounted systems range from $3.11 to $3.60+ per watt due to additional foundation, trenching, and conduit costs. However, if your roof requires replacement before panel installation (adding $8,000–$15,000), the ground-mount option may be more cost-effective overall. For a detailed cost breakdown by project type, see Jia Mao Bipv’s photovoltaic installation cost guide.
2. Do ground-mounted solar panels produce more energy than roof-mounted?
Given the same panel wattage and sunlight conditions, ground-mounted and roof-mounted panels produce equivalent electricity. However, ground-mount systems can be optimized for the exact tilt and azimuth angle that maximizes annual yield, while roof-mounted systems are constrained by existing roof geometry. In practice, a well-positioned ground-mount system produces 5–15% more annual energy than a roof-mount system on a sub-optimally oriented roof. Single-axis tracking on ground mounts adds another 15–25% yield increase.
3. What is the difference between rail and rail-less mounting systems?
Rail-based systems use continuous aluminum rails attached to the roof, with panels clamped to the rails. Rail-less systems eliminate the rails and mount panels directly to individual roof brackets. Rail-less systems use 30–50% fewer components, install 20–40% faster, and create a lower-profile appearance. Rail systems provide better load distribution and are preferred for high-wind zones, heavy snow regions, and large arrays. The choice depends primarily on your local wind and snow loads, roof type, and installer preference.
4. Should I choose a grid-tied, off-grid, or hybrid solar system?
If you have reliable grid access and your utility offers net metering, a grid-tied system delivers the lowest cost and fastest payback. If you experience frequent power outages or want backup power for critical loads, a hybrid system adds battery storage for 30–50% more cost. If you have no grid connection available (remote cabin, agricultural site), off-grid is necessary but will cost 2–3× more than grid-tied and require higher ongoing maintenance. The hybrid share of U.S. residential installations has been growing rapidly as battery costs decline.
5. How long does solar panel installation take?
The physical panel installation typically takes 1–3 days for a residential system, depending on the mounting method. Rail-based roof mounts take 8–12 hours of panel work for an 8 kW system; rail-less systems take 5–8 hours; and ground mounts take 12–20 hours including foundation work. The total project timeline from contract to energization is usually 4–12 weeks, driven primarily by permitting, utility interconnection approval, and equipment lead times rather than the installation itself.
6. What is BIPV and how does it differ from traditional solar mounting?
Building-Integrated Photovoltaics (BIPV) replaces conventional building materials — roof tiles, glass façades, canopies — with photovoltaic components that generate electricity while serving as the building envelope. Unlike traditional solar, BIPV does not require a separate mounting system; the panels are the building material. This eliminates racking hardware, reduces roof penetrations, and creates a seamless aesthetic. BIPV technology advantages are most compelling for new construction and major renovations where the cost of conventional roofing or cladding is being incurred regardless.
7. Is the federal solar tax credit still available in 2026?
The 30% residential solar ITC expired on December 31, 2025, following the passage of the One Big Beautiful Bill Act. Homeowners who installed solar after that date no longer qualify for the federal residential credit. However, commercial and industrial solar projects that commenced construction by July 4, 2026 can still claim the 30% ITC under Section 48E, with potential bonus adders for domestic content and energy community locations. State-level incentives, property tax exemptions, and utility rebate programs continue to vary by location.
8. Can I install solar panels myself to save money?
DIY solar installation is technically legal in most U.S. jurisdictions, and it can save 30–50% on labor costs. However, it requires electrical knowledge, comfort working at height (for roof mounts), and the ability to navigate the permitting and inspection process. Most utilities require a licensed electrician to sign off on the grid interconnection. DIY is most practical for ground-mounted, off-grid systems where grid interconnection is not required. For roof-mounted grid-tied systems, the permitting, warranty, and safety risks generally favor professional installation.
9. How do I know if my roof is suitable for solar panels?
Your roof should meet four criteria: structural adequacy (capable of supporting 2.5–4 lb/sq ft additional load), remaining useful life of at least 15 years, sufficient unshaded south-facing (Northern Hemisphere) area for the desired system size, and a pitch between 15° and 40° for optimal performance. A professional site assessment with shade analysis (using tools like Aurora Solar or SolarEdge Designer) will quantify these factors. If your roof falls short on any criterion, consider a ground-mount system or BIPV solar shingles as part of a roof replacement.
10. What maintenance does a solar panel system require?
Grid-tied rooftop systems are remarkably low-maintenance: annual inspection of connections and mounting hardware, periodic cleaning (1–2 times per year, or as needed in dusty/pollen-heavy environments█


-300x300.jpg)